Persistent Volumes for Tanzu on VMware Cloud on AWS using Amazon FSx for NetApp ONTAP

Featured

Amazon FSx for NetApp ONTAP provides fully managed shared storage in the AWS Cloud with the popular data access and management capabilities of ONTAP and this blog post we are going to use these volumes mount as Persistent Volumes on Tanzu Kubernetes Clusters running on VMware Cloud on AWS

With Amazon FSx for NetApp ONTAP, you pay only for the resources you use. There are no minimum fees or set-up charges. There are five Amazon FSx for NetApp ONTAP components to consider when storing and managing your data: SSD storage, SSD IOPS, capacity pool usage, throughput capacity, and backups.

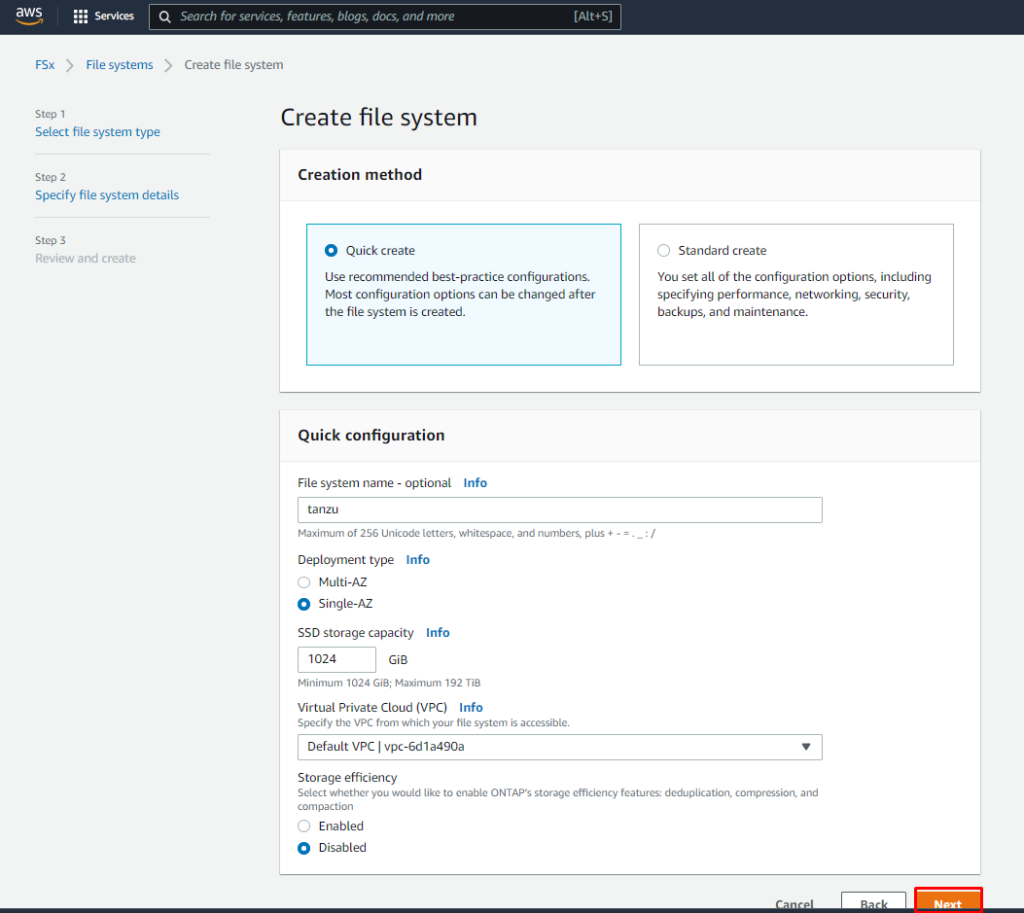
The Amazon FSx console has two options for creating a file system – Quick create option and Standard create option. To rapidly and easily create an Amazon FSx for NetApp ONTAP file system with the service recommended configuration, I use the Quick create option.

The Quick create option creates a file system with a single storage virtual machine (SVM) and one volume. The Quick create option configures this file system to allow data access from Linux instances over the Network File System (NFS) protocol.

In the Quick configuration section, for File system name – optional, enter a name for your file system.

For Deployment type choose Multi-AZ or Single-AZ.

  • Multi-AZ file systems replicate your data and support failover across multiple Availablity Zones in the same AWS Region.
  • Single-AZ file systems replicate your data and offer automatic failover within a single Availability Zone, for this post i am creating in Single AZ
  • SSD storage capacity, specify the storage capacity of your file system, in gibibytes (GiBs). Enter any whole number in the range of 1,024–196,608.
  • For Virtual Private Cloud (VPC), choose the Amazon VPC that is associate with your VMware Cloud on AWS SDDC.

Review the file system configuration shown on the Create ONTAP file system page. For your reference, note which file system settings you can modify after the file system is created.

Choose Create file system.

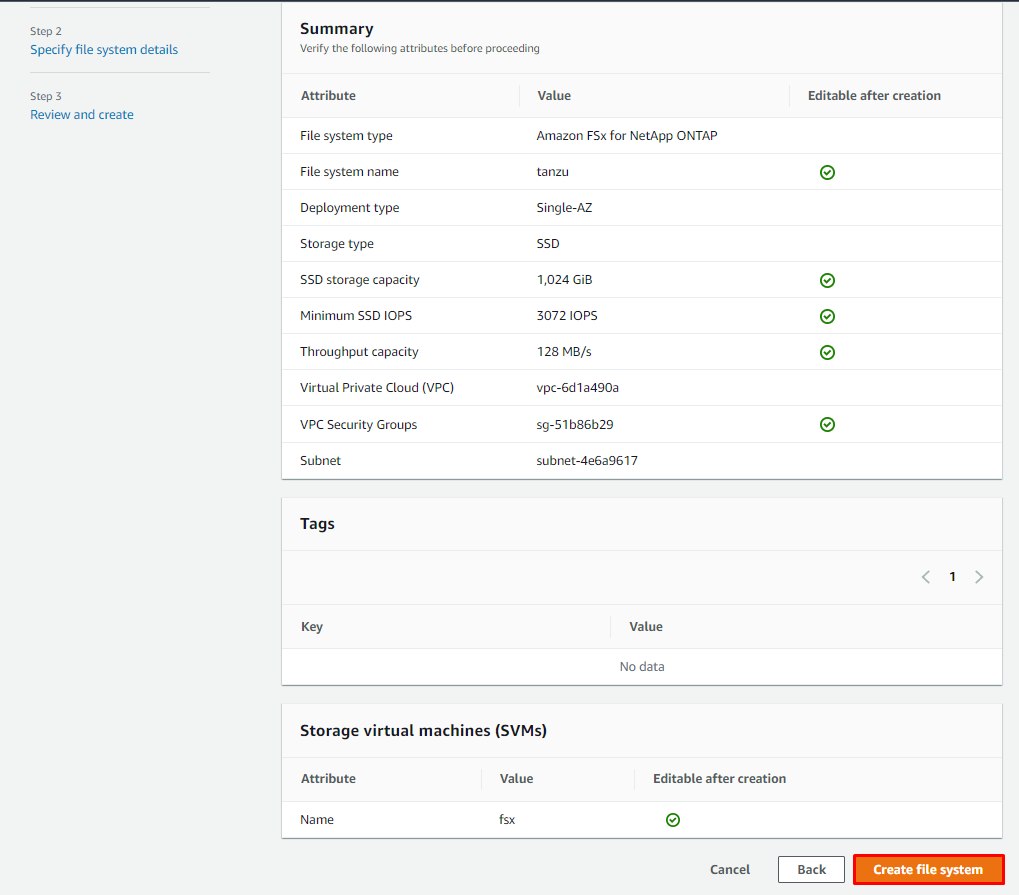
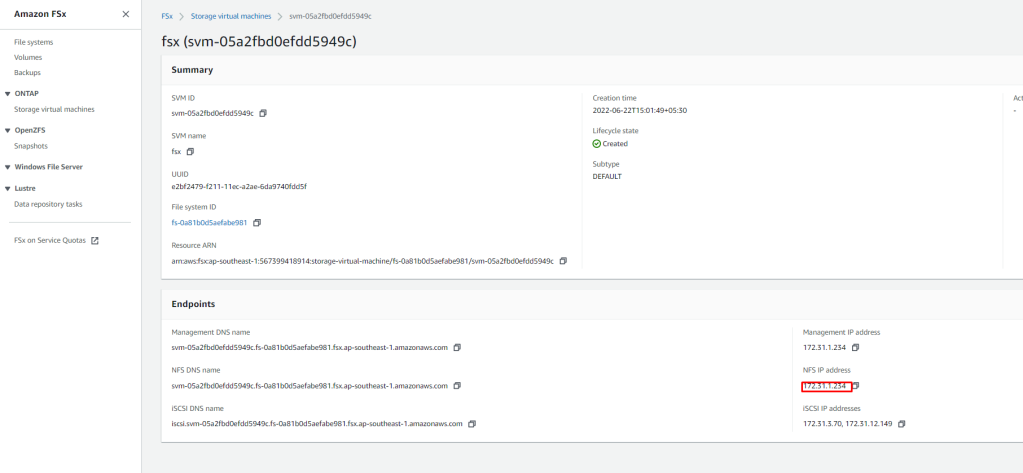
Quick create creates a file system with one SVM (named fsx) and one volume (named vol1). The volume has a junction path of /vol1 and a capacity pool tiering policy of Auto.

For us to use this SVM, we need to get the IP address of SVM for NFS , Click on SVM ID and take a note of this IP, we will use this IP in our NFS configurations for Tanzu.

Kubernetes NFS-Client Provisioner

NFS subdir external provisioner is an automatic provisioner that use your existing and already configured NFS server to support dynamic provisioning of Kubernetes Persistent Volumes via Persistent Volume Claims. Persistent volumes are provisioned as ${namespace}-${pvcName}-${pvName}.

More Details – Explained here in detail https://github.com/kubernetes-sigs/nfs-subdir-external-provisioner 

I am deploying this on my Tanzu Kubernetes cluster which is deployed on VMware Cloud on AWS.

  • Add the helm repo –
#helm repo add nfs-subdir-external-provisioner https://kubernetes-sigs.github.io/nfs-subdir-external-provisioner/
  • Install using as below:
#helm install nfs-subdir-external-provisioner nfs-subdir-external-provisioner/nfs-subdir-external-provisioner \
    --set nfs.server=<IP address of Service> \
    --set nfs.path=/<Volume Name>
#My command will be like this#
#helm install nfs-subdir-external-provisioner nfs-subdir-external-provisioner/nfs-subdir-external-provisioner \
    --set nfs.server=172.31.1.234 \
    --set nfs.path=/vol1

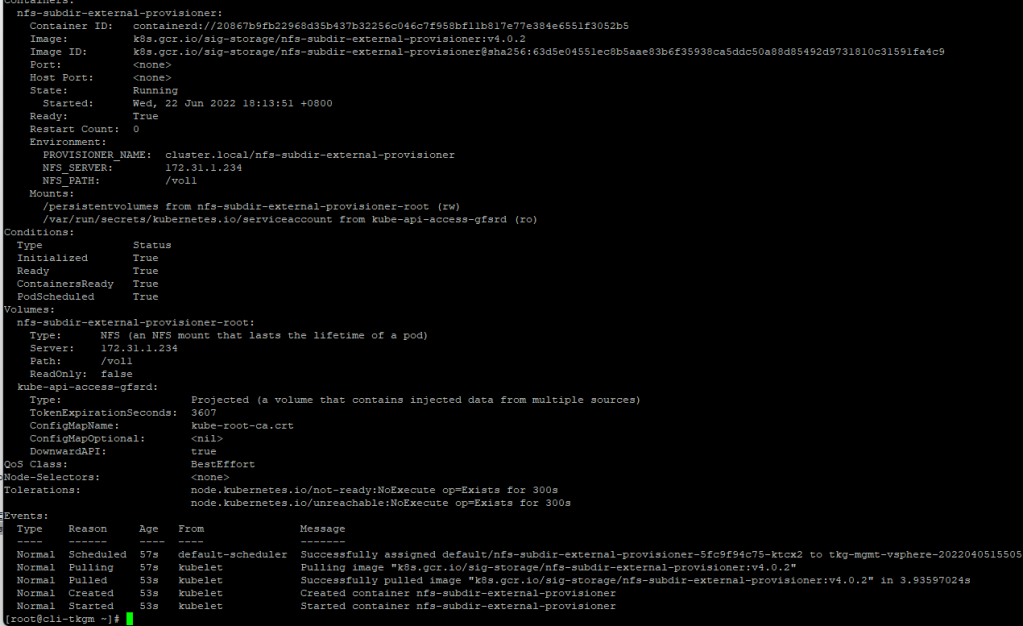
Post installation of chart, you can check the status of Pod, it is not in running state then describe and see where it stuck

Finally, Test Your Environment!

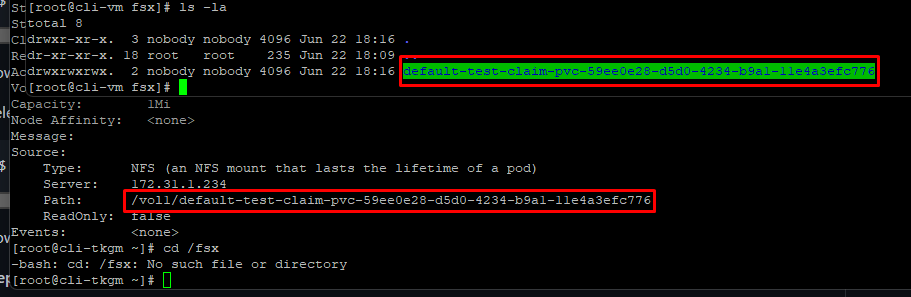
Now we’ll test your NFS subdir external provisioner by creating a persistent volume claim and a pod that writes a test file to the volume. This will make sure that the provisioner is provisioning and that the Amazon FSx for NetApp ONTAP service is reachable and writable.

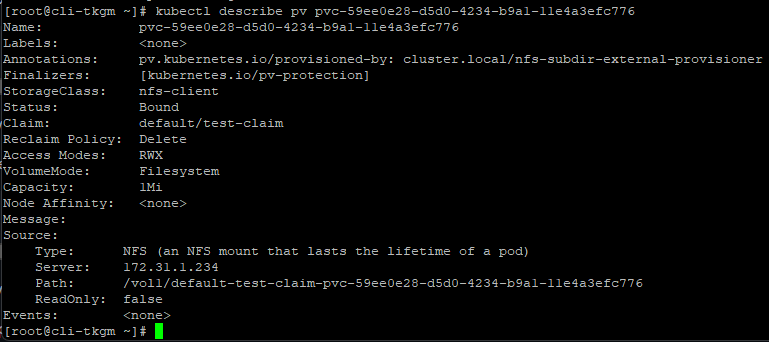
As you can see deployed application created an PV and PVC successfully on Amazon FSx for NetApp ONTAP

Describe the Persistent Volume to see the source of it, as you can see below it is created on NFS running on SVM having IP – 172.31.1.234

This is the power of VMware Cloud on AWS and AWS native services, customers can use any AWS native service without worrying about egress charges as well as security as everything is being configured and accessed over the private connections.

Building Windows Custom Machine Image for Creating Tanzu Workload Clusters

Featured

If your organisation is building an application based on Windows components (such as .NET Framework) and willing to deploy Windows containers on VMware Tanzu, this blog post is on how to build a Windows custom machine image and deploy windows Kubernetes cluster.

Windows Image Prerequisites 

  • vSphere 6.7 Update 3 or greater
  • A macOS or Linux workstation, Docker Desktop and Ansible must be installed on workstation
  • Tanzu Kubernetes Grid v1.5.x or greater
  • Tanzu CLI
  • A Recent Image of Windows 2019 (newer than April 2021) and must be downloaded from Microsoft Developer Network (MSDN) or Volume Licensing (VL) account.
  • The latest VMware Tools Windows ISO image. Download from VMware Tools
  • on vCenter, Inside a data store create a folder such as iso and upload windows ISO and VMware Tools iso

Build a Windows Image 

  • Deploy Tanzu Management Cluster with Ubuntu 2004 Kubernetes v1.22.9 OVA
  • Create a YAML file named builder.yaml with the following configuration, On my local system I have saved this yaml as builder.yaml
apiVersion: v1
kind: Namespace
metadata:
 name: imagebuilder
---
apiVersion: v1
kind: Service
metadata:
 name: imagebuilder-wrs
 namespace: imagebuilder
spec:
 selector:
   app: image-builder-resource-kit
 type: NodePort
 ports:
 - port: 3000
   targetPort: 3000
   nodePort: 30008
---
apiVersion: apps/v1
kind: Deployment
metadata:
 name: image-builder-resource-kit
 namespace: imagebuilder
spec:
 selector:
   matchLabels:
     app: image-builder-resource-kit
 template:
   metadata:
     labels:
       app: image-builder-resource-kit
   spec:
     nodeSelector:
       kubernetes.io/os: linux
     containers:
     - name: windows-imagebuilder-resourcekit
       image: projects.registry.vmware.com/tkg/windows-resource-bundle:v1.22.9_vmware.1-tkg.1
       imagePullPolicy: Always
       ports:
         - containerPort: 3000

Connect the Kubernetes CLI to your management cluster by running:

#kubectl config use-context MY-MGMT-CLUSTER-admin@MY-MGMT-CLUSTER

Apply the builder.yaml file as below:

To ensure the container is running run below command:

List the cluster’s nodes, with wide output and take note of Internal IP address value of the node with ROLE listed as control-plane,master

#kubectl get nodes -o wide

Retrieve the containerd component’s URL and SHA, Query the control plane’s  nodePort  endpoint:

#curl http://CONTROLPLANENODE-IP:30008

Take note of containerd.path and containerd.sha256 values. The containerd.path value ends with something like containerd/cri-containerd-v1.5.9+vmware.2.windows-amd64.tar.

Create a JSON file in an empty folder named windows.json with the following configuration:

{
 "unattend_timezone": "WINDOWS-TIMEZONE",
 "windows_updates_categories": "CriticalUpdates SecurityUpdates UpdateRollups",
 "windows_updates_kbs": "",
 "kubernetes_semver": "v1.22.9",
 "cluster": "VSPHERE-CLUSTER-NAME",
 "template": "",
 "password": "VCENTER-PASSWORD",
 "folder": "",
 "runtime": "containerd",
 "username": "VCENTER-USERNAME",
 "datastore": "DATASTORE-NAME",
 "datacenter": "DATACENTER-NAME",
 "convert_to_template": "true",
 "vmtools_iso_path": "VMTOOLS-ISO-PATH",
 "insecure_connection": "true",
 "disable_hypervisor": "false",
 "network": "NETWORK",
 "linked_clone": "false",
 "os_iso_path": "OS-ISO-PATH",
 "resource_pool": "",
 "vcenter_server": "VCENTER-IP",
 "create_snapshot": "false",
 "netbios_host_name_compatibility": "false",
 "kubernetes_base_url": "http://CONTROLPLANE-IP:30008/files/kubernetes/",
 "containerd_url": "CONTAINERD-URL",
 "containerd_sha256_windows": "CONTAINERD-SHA",
 "pause_image": "mcr.microsoft.com/oss/kubernetes/pause:3.5",
 "prepull": "false",
 "additional_prepull_images": "mcr.microsoft.com/windows/servercore:ltsc2019",
 "additional_download_files": "",
 "additional_executables": "true",
 "additional_executables_destination_path": "c:/k/antrea/",
 "additional_executables_list": "http://CONTROLPLANE-IP:30008/files/antrea-windows/antrea-windows-advanced.zip",
 "load_additional_components": "true"
}

update the values in file as below:

Add the XML file that contains the Windows settings by following these steps:

  • Go to the autounattend.xml file on VMware {code} Sample Exchange.
  • Select Download.
  • If you are using the Windows Server 2019 evaluation version, remove <ProductKey>...</ProductKey>.
  • Name the file autounattend.xml.
  • Save the file in the same folder as the windows.json file and change permission of file to 777.

From your client VM run following command from folder containing your windows.json and autounattend.xml file:

#docker run -it --rm --mount type=bind,source=$(pwd)/windows.json,target=/windows.json --mount type=bind,source=$(pwd)/autounattend.xml,target=/home/imagebuilder/packer/ova/windows/windows-2019/autounattend.xml -e PACKER_VAR_FILES="/windows.json" -e IB_OVFTOOL=1 -e IB_OVFTOOL_ARGS='--skipManifestCheck' -e PACKER_FLAGS='-force -on-error=ask' -t projects.registry.vmware.com/tkg/image-builder:v0.1.11_vmware.3 build-node-ova-vsphere-windows-2019

NOTE: Before you run below command, make sure your workstation is running “Docker Desktop” as well “Ansible”

To ensure the Windows image is ready to use, select your host or cluster in vCenter, select the VMs tab, then select VM Templates to see the Windows image listed.

Use a Windows Image for a Workload Cluster

Use a Windows Image for a Workload Cluster, below yaml shows you how to deploy a workload cluster that uses your Windows image as a template. (This windows cluster is using NSX Advance LB)

#! ---------------------------------------------------------------------
#! non proxy env configs
#! ---------------------------------------------------------------------
CLUSTER_CIDR: 100.96.0.0/11
CLUSTER_NAME: tkg-workload02
CLUSTER_PLAN: dev
ENABLE_CEIP_PARTICIPATION: 'true'
IS_WINDOWS_WORKLOAD_CLUSTER: "true"
VSPHERE_WINDOWS_TEMPLATE: windows-2019-kube-v1.22.5
ENABLE_MHC: "false"

IDENTITY_MANAGEMENT_TYPE: oidc

INFRASTRUCTURE_PROVIDER: vsphere
SERVICE_CIDR: 100.64.0.0/13
TKG_HTTP_PROXY_ENABLED: false
DEPLOY_TKG_ON_VSPHERE7: 'true'
VSPHERE_DATACENTER: /SDDC-Datacenter
VSPHERE_DATASTORE: WorkloadDatastore
VSPHERE_FOLDER: /SDDC-Datacenter/vm/tkg-vmc-workload
VSPHERE_NETWORK: /SDDC-Datacenter/network/tkgvmc-workload-segment01
VSPHERE_PASSWORD: <encoded:T1V3WXpkbStlLUlDOTBG>
VSPHERE_RESOURCE_POOL: /SDDC-Datacenter/host/Cluster-1/Resources/Compute-ResourcePool/Tanzu/tkg-vmc-workload
VSPHERE_SERVER: 10.97.1.196
VSPHERE_SSH_AUTHORIZED_KEY: ssh-rsa....loudadmin@vmc.local

VSPHERE_USERNAME: cloudadmin@vmc.local
WORKER_MACHINE_COUNT: 3
VSPHERE_INSECURE: 'true'
ENABLE_AUDIT_LOGGING: 'true'
ENABLE_DEFAULT_STORAGE_CLASS: 'true'
ENABLE_AUTOSCALER: false
AVI_CONTROL_PLANE_HA_PROVIDER: 'true'
OS_ARCH: amd64
OS_NAME: photon
OS_VERSION: 3

WORKER_SIZE: small
CONTROLPLANE_SIZE: large
REMOVE_CP_TAINT: "true"

if your cluster yaml file is correct, you should see that new windows cluster has been started to deploy.

and after some time if should deploy cluster sucessfully.

In case if you are using NSX-ALB AKO or Pinniped and see that those pods are not running, please refer Here

NOTE – if you see this error during image build process : Permission denied: ‘./packer/ova/windows/windows-2019/autounattend.xml, check the permission of file autounattend.yaml