vCloud Director 10 : VM Placement Policies

vCloud Director 10 has introduced a new concept called VM placement policies which helps Cloud Provider to control the virtual machine (VM) placement on a specific cluster or host.VM placement policies give cloud providers various options to allocate resources to various use cases like:

  1. Deploy VM’s to specific cluster based on performance requirement
  2. Deploy VM’s to Specific cluster based on resource requirements
  3. Deploy VM’s based on Licensing requirement as a part of Oracle/SQL licenses optimisation
  4. Allocate specific hosts to specific Tenants
  5. Deploy container/special use case specific VMs to a specific host/cluster
  6. Restrict elastic VDC pools to deploy VMs to a specific cluster

vCD Provider administrator create and manage VM placement policies and placement policies are created and managed for each provider VDC, because a VM placement policy is scoped at the provider VDC level.

Create a VM Placement Policy

Before we create VM Placement policies, provider need to perform few steps on vCenter , so lets go and login to vCenter which is providing resource to vCloud Director and go to Cluster -> Configure -> VM/Host Groups

1.png

In this case i want to limit deployment of Oracle and MS SQL VM’s to specific hosts due to licensing, so let’s create Hosts groups and VM Groups:

Host Groups: 

To create Host Groups , Click on Add inside VM/Host Groups:

  1. Enter  Host Group Name
  2. Select Type as “Host Group”
  3. Click on Add to add Host/Hosts of the cluster.

2

VM Groups

To create VM Groups , Click on Add inside VM/Host Groups

  1. Enter  VM Group Name
  2. Select Type as “VM Group”
  3. Click on Add to add VM/VMs of the cluster. (select any dummy VM as of now)

3

once both the groups has been created go to VM/Host rules in the cluster and create a rule.

4.png

VM/Host Rules

To create VM/Host Rules, Click on Add inside VM/Host Rules

  1. Enter  Rule Name
  2. Ensure “Enable rule”
  3. Select rule type as “Virtual Machine to Hosts”
  4. VM Group: Select VM Group that we have created above
  5. Here you have four choices: (In my case i have choose Must rule)
    • Must run on host in group
    • Should run on host in group
    • Must not run on host in group
    • Should not run on host in group
  6. Host Group: Select Host Group that we have created above

5.png

From vCenter prospective we are done, we have multiple choice to create VM to Hosts affinity/anti-affinity rules , once we have created rules , vCloud director picks up only “VM Groups” which provider will expose to tenants.

Create VM Placement Policies in vCloud Director

  1. Go to Provider VDCs.
  2. Click on a provider VDC from the list , in my case it was “nsxtpvdc”
  3. Click on “VM Placement Policies”
  4. Click the VM Placement Policies tab and click New.

6

New Policy Creation Wizard

  1. First Page , click on Next
    1. 7
  2. Enter a name for the VM placement policy and description and click Next
    1. 8.png
  3. Select the VM groups or logical VM groups to which you want the VM to be linked and click Next.
    1. 9.png

  4. Review the VM placement policy settings and click Finish.
    1. 10.png

Publish VM Placement Policies to Org VDC

When provider creates a VM placement policy, it is not visible to tenants. Provider need to publish a VM placement policy to an org VDC to make it available to tenants and publishing a VM placement policy to an org VDC makes the policy visible to tenants. The tenant can select the policy when they:

  • Create a new standalone VM
  • Create a VM from a template,
  • edit a VM
  • add a VM to a vApp
  • Create a vApp from a vApp template. 

To publish this newly created policy to tenants , go to:

  1. Organization VDCs and Select an organization VDC
    1. 11.png
  2. Click the VM Placement Policies tab and Click Add.
    1. 12.png
  3. Select the VM placement policies that you want to add to the organization VDC and click OK.
    1. 13.png
  4. Provider can make certain policies as “Default” when customer does not choose any policy , system will automatically use “Default”.
    1. 14.png

Policy Usage by Tenant

Once policies has been created and exposed to tenant organisation, tenant can use those policies while provisioning VMs. like here i have created two policies “Oracle” and “SQL” and tenant can choose based on workload requirement.

15.png

NOTE –  Placement Policies are optional and a provider can continue to use the default policy that is created during installation and only one policy can be assigned to a VM.

This completes the creation of placement policies and their exposure to tenants. please feel free to share/comment.


Connect AWS Transit Gateway to VMware Cloud on AWS

This post is to deploy AWS transit Gateway and connect with VMware Cloud on AWS.

AWS Transit Gateway 

AWS Transit Gateway is a service that helps customers to connect their AWS VPC and their on-premises networks to a single gateway. As customers grow the number of workloads running on Native AWS or VMware Cloud on AWS , Customer need to be able to scale your networks across multiple accounts and Amazon VPCs/VMC to keep up with the growth.

With AWS TGW, you only have to create and manage a single connection from the central gateway in to each Amazon VPC , VMware Cloud on AWS , on-premises data center or even remote office across your network. Transit Gateway acts as a hub that controls how traffic is routed among all the connected networks which act like spokes

Now to setup Transit Gateway let’s go to VPC Dashboard inside your region where you want to deploy Transit Gateway and Click on create Transit Gateway:

3.png

Enter Required details like:

  • Name & Description
  • Amazon side ASN ( in between 64512 to 65535)
  • leave other as default or select/unselect based on your requirement.

1.png

This is will create a TGW, once TGW is created, wait for few minutes , it will show “available” in AWS console.

4.png

Connect TGW to VMware Cloud on AWS

Pervious step we created TGW and to attach to VMware Cloud on AWS or any other VPC , you need to go to “Transit Gateway  Attachment” and Click on “Create Transit Gateway Attachment”

6.png

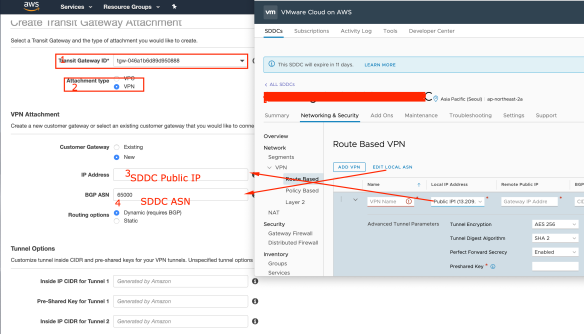
On the new Transit Gateway Attachment page , input parameters as below:

  1. Transit Gateway ID – Choose TGW which you have created in previous step
  2. Attachment Type – VPN
  3. IP Address – get Public IP address from your VMC SDDC
  4. ASN – get ASN from your VM SDDC
  5. you can leave other things “Default” or enter based on specific requirement

7.png

Once created attachment , it will look like this:8.png

Once attachment is created , you can see it under “Site-to-Site VPN Connections” , from there follow below steps to download VPN config file:

  1. Go to Site-to-Site VPN Connections
  2. Select VPN Attachment which we created in previous step
  3. Click on “Download Configuration”
  4. Select “Generic”
  5. Click Download

9.png

Open downloaded config file and go to VMware Cloud on AWS SDDC and create a route based tunnel by input information from config file which we have downloaded in previous step.

  1. IKE Version – match in SDDC as per config file
  2. Copy the “Pre-shared Key” and paste in to SDDC “Preshared Key”
  3. Enter “Virtual Private Gateway” IP as “Remote Public IP” in side SDDC VPN config.
  4. Enter “Customer Gateway” as “BGP Local IP/Prefix Length” inside SDDC VPN config.
  5. Enter “Neighbor IP address” as “BGP Remote IP” inside SDDC VPN config.
  6. Enter “Virtual Private Gateway ASN” inside “BGP Remote ASN” inside SDDC VPN.

10.png

If every thing entered correctly , you will see , Tunnel and BGP is up and if tunnel is not up ensure Compute gateway firewall is configured appropriate as default Firewall rule for VPN in VMware cloud on AWS SDDC is “Drop”.

11.png

So tunnel and BGP is up. you can check connectivity between a VPC attached to TGW and SDDC, this should be up if you have populated proper routes in AWS route table.