Deploy Tanzu Kubernetes Clusters using Tanzu Mission Control

Featured

VMware Tanzu Mission Control is a centralized management platform for consistently operating and securing your Kubernetes infrastructure and modern applications across multiple teams and clouds.

TMC is Available through VMware Cloud services, Tanzu Mission Control provides operators with a single control point to give developers the independence they need to drive business forward, while ensuring consistent management and operations across environments for increased security and governance.

Use Tanzu Mission Control to manage your entire Kubernetes footprint, regardless of where your clusters reside.

Getting Started with Tanzu Mission Control

To get Started with Tanzu Mission Control, use VMware Cloud Services tools to gain access to VMware Tanzu Mission Control

Launch the TMC Console – Log in to the Tanzu Mission Control console to start managing clusters

Create a Cluster Group – Create a cluster group to help organize and manage your clusters

Register TKGs Management Cluster – When customer registers a Tanzu Kubernetes Grids management cluster, you can bring all of its workload clusters under the management of Tanzu Mission Control, which helps customer to facilitate consistent management using all of the capabilities of Tanzu Mission Control, as well as provisioning resources and creating new clusters directly from Tanzu Mission Control.

Once customer has access to Tanzu Mission Control and created cluster group and registered management cluster, follow below video to deploy Kubernetes clusters on vCenter using management cluster. Video has step-by-Step instruction to help customers for their TMC journey.

Tanzu mission control help customers to bring all the K8s clusters together and once together you can manage policies and configuration of these clusters and help developers to self services.

Now Tanzu Mission Control is available as VMware Cloud Provider Partners as a Software-as-a-Service (SaaS) offering through the VMware Cloud Partner Navigator, this unlocks new opportunities for cloud providers to offer Kubernetes (K8s) managed services for a multi-cloud and multi-team environment. For more details check HERE or reach out to your Business Development Manager.

Deploy Harbor Registry on TKG Clusters

Featured

Tanzu Kubernetes Grid Service, informally known as TKGS, lets you create and operate Tanzu Kubernetes clusters natively in vSphere with Tanzu. You use the Kubernetes CLI to invoke the Tanzu Kubernetes Grid Service and provision and manage Tanzu Kubernetes clusters. The Kubernetes clusters provisioned by the service are fully conformant, so you can deploy all types of Kubernetes workloads you would expect. vSphere with Tanzu leverages many reliable vSphere features to improve the Kubernetes experience, including vCenter SSO, the Content Library for Kubernetes software distributions, vSphere networking, vSphere storage, vSphere HA and DRS, and vSphere security.

Harbor is an open source, trusted, cloud native container registry that stores, signs, and scans content. Harbor extends the open source Docker Distribution by adding the functionalities usually required by users such as security, identity control and management. so lets go ahead and deploy harbor.I have already provisioned an TKG cluster and you can login to TKG cluster by using below command:

#kubectl vsphere login --server=<supervisor-cluster-ip> --tanzu-kubernetes-cluster=<namespace-name> --tanzu-kubernetes-cluster-name=<cluster-name>

Set the correct context as you might have many clusters by using below command:

#kubectl config use-context <cluster-name01>

Add Harbor Helm repository

Now lets install Harbor, you can use various Helm repositories.

Harbor –  https://github.com/goharbor/harbor-helm or also the one from

Bitnami –  https://github.com/bitnami/charts/tree/master/bitnami/harbor which I’m going to use.

Add the repository of your choice to your client…

#helm repo add harbor https://helm.goharbor.io
#helm repo add bitnami https://charts.bitnami.com/bitnami

…and update Helm subsequently.

#helm repo update

Installing Harbor

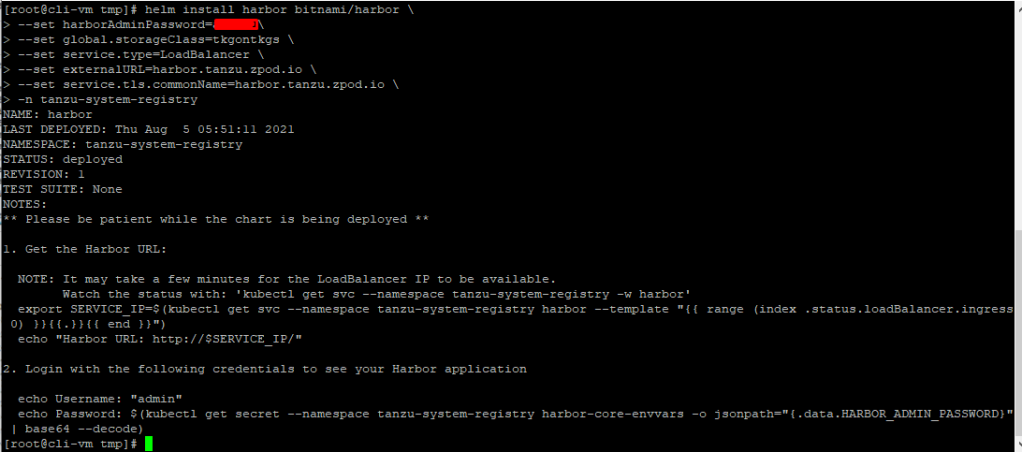
We will deploy Harbor in a new Kubernetes Namespace which we will name “tanzu-system-registry”. Create the Namespace with kubectl create ns harbor and start the deployment process by executing the following helm command with some corresponding options:

helm install harbor bitnami/harbor \
--set harborAdminPassword=admin \
--set global.storageClass=tkgontkgs \
--set service.type=LoadBalancer \
--set externalURL=harbor.tanzu.zpod.io \
--set service.tls.commonName=harbor.tanzu.zpod.io \
-n tanzu-system-registry

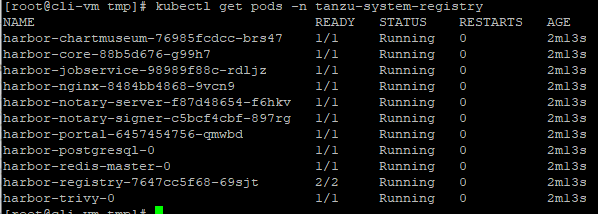
Go and check the pods status by using this command:

#kubectl get pods -n tanzu-system-registry

lets check the services running inside “tanzu-system-registry” namespace, this will give us external IP of the service.

#kubectl get svc -n tanzu-system-registry

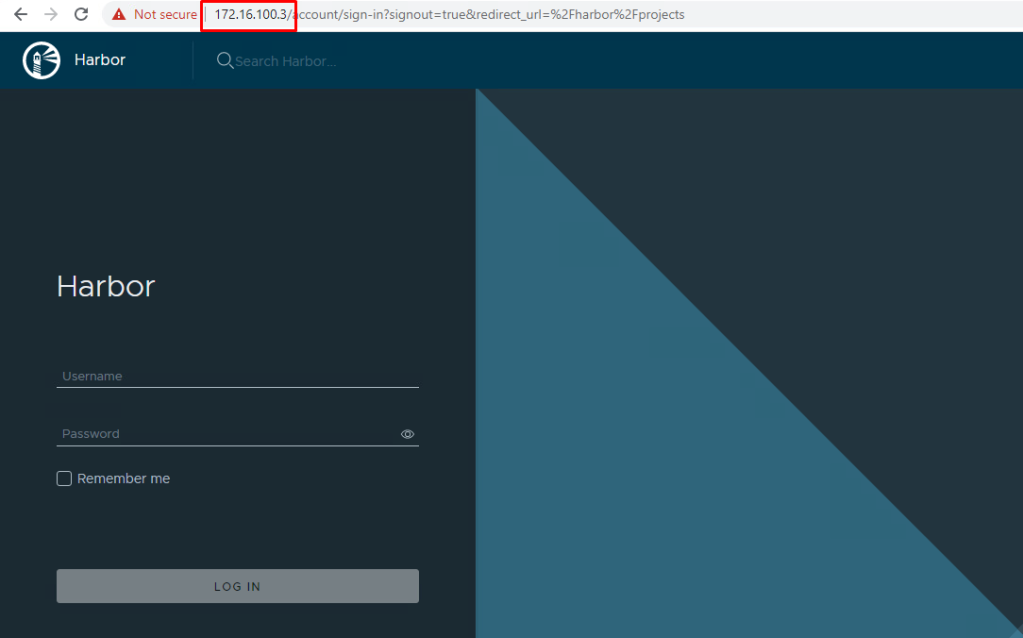
Above command will give us an “External IP” which got auto configured in NSX-T, Lets browse using external IP using user name as “admin” and password which we set in the helm command

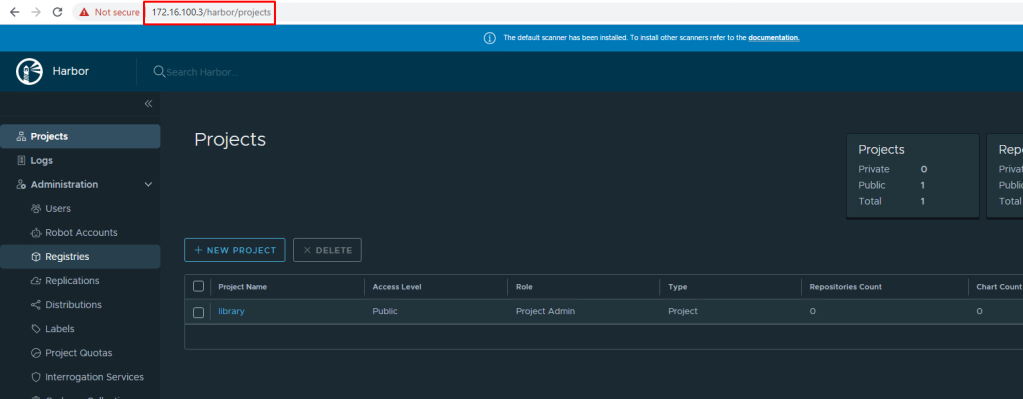
Now we can successfully browse and access the registry successfully

You can push images to the Harbor registry to make them available to all clusters that are running in the Tanzu Kubernetes Grid instance. for me this i have deployed for my “Tanzu Build Service” installation as TBS needs registry as pre-requisite.