NSX-T 2.0 – Host Preparation

A fabric node is a node that has been registered with the NSX-T management plane and has NSX-T modules installed. For a hypervisor host to be part of the NSX-T overlay, it must first be added to the NSX-T fabric.

As we know NSX-T is vCenter agnostic, the Host Switch is configured from the NSX manager UI. The NSX manager owns the life-cycle of the Host Switch and the Logical Switch creation on these Host Switches.

  • Go to Fabric – > Nodes and check the Hosts tab and Click on ADD

1

  • Enter Name of the Host , IP address of the host , choose OS tpye , since in this exercise i am adding an ESXi host , so chosen “ESXi” , Enter “root” credentials and most important enter the thumb print and to get the thumb print enter below command on ESXi command prompt – # openssl x509 -in /etc/vmware/ssl/rui.crt -fingerprint -sha256 -noout

6

  • Click Save.

2

  • If you do not enter the host thumbprint, the NSX-T UI prompts you to use the default thumbprint in the plain text format retrieved from the host.

3

Monitor the progress , it will install NSX binaries on Hosts.

  • Since i am deploying in my Home lab and my ESXi Host was having 12 GB RAM and installation failed because minimum RAM requirement is 16GB.

4

  • and finally vibs successfully installed.

5

Now lets add the host in to Management Plane

Joining the hypervisor hosts with the management plane ensures that the NSX Manager and the hosts can communicate with each other.

  • Open an SSH session to the NSX Manager appliance and  Log in with the Administrator credentials.On the NSX Manager appliance, run the get certificate api thumbprint command.  “The command output is a string of numbers that is unique to this NSX Manager.”  Copy this String

7

  • Now Open an SSH session to the hypervisor host and run the join management-plane command.

8

  • Provide the following information:
    •  Hostname or IP address of the NSX Manager with an optional port number
    • Username of the NSX Manager
    • Certificate thumbprint of the NSX Manager
    • Password of the NSX Manager

9

  • Command will prompt for Password for API user: <NSX-Manager’s-password> and if everything is fine then you should get “Node successfully joined”

1.png

Next post i will be targeting to prepare KVM host , till then Happy Learning 🙂

NSX-T 2.0 – Deploying NSX Controller

NSX controllers controls virtual networks and overlay transport tunnels. NSX Controllers are deployed as a cluster of highly available vApps that are responsible for the automated deployment of virtual networks across the entire NSX-T architecture and  to achieve high availability of control plane the NSX Controllers are deployed in a cluster of three instances.

Deploying the NSX Controller is almost similar to deploying the NSX Manager appliance. I’ve deployed one NSX Controllers onto the same network as the NSX Manager.

Let’s Start Deploying Controller:

1 – First login to ESXi using HTML5 Client and run the New Virtual Machine wizard and select “Deploy a virtual machine from an OVF or OVA file”


C1

2 – Enter the name for the NSX-T Controller appliance (nsxc.avnlab.com) and choose NSX-T controller appliance OVA (nsx-controller-2.0.0.0.0.6522091.ova)

c2

3 – Choose your storage

c3

4 – Choose your Network and disk type

c4

5 – Enter various password for “Root User” , “admin User” and “audit User” , we need to setup a complex password.Password complexity requirements are as below:

  • At least eight characters
  • At least one lower-case letter
  • At least one upper-case letter
  • At least one digit
  • At least one special character
  • At least five different characters
  • No dictionary words
  • No palindromes

c5

6 – in the same window Enter the “Host Name”, Default Gateway, IP address and Other network related information.

c6

7 – Review the configuration and click Finish

c7

8 – it will take some time and once ova import completes  , you are done.

c8

Validate Controller Network Configuration as below:

1.png

Connect Controller Cluster to NSX Manager

Get NSX Manager API thumbprint

  1. Log onto the NSX Manager via SSH using the admin credentials.
  2. Use get certificate api thumbprint to get the SSL certificate thumbprint. Copy the output to use later
  3. 2.png

Join NSX Controller to NSX Manager


  1. Log on to the NSX Controllers via SSH using the admin credentials.
  2. Use join management-plane <NSX Manager> username admin thumbprint <API Thumbprint>
  3. 3
  4. command will prompt for “admin” password.
  5. Once entered , wait for some time , if all goes well then you will see below “successful” message .
  6. 4
  7. Enter command on NSX Controller as “get managers” to view the connection to Manager
  8. 5
  9. On NSX manager run command “get nodes” to view registration is successful..
  10. 6.png
  11. From the command line using command “get management-cluster status ” you can see the details and their status  –  Controllers is listed in the control cluster, but the cluster status is “UNSTABLE”.
  12. 7.png

Configure the Controller Cluster:

To configure the Controller cluster you need to log on to any of the Controllers and initialise the cluster. Since this i am deploying in my Home Lab and have a single cluster , so let’s login to Controller and initialize the the cluster.


  1. Log onto the Controller node via SSH using the admin credentials.
  2. Use set control-cluster security-model shared-secret to configure the shared secret
  3. 8.png
  4. after the secret is configured, use initialize control-cluster to promote this node as Master controller
  5. 9
  6. Now , if you see “Control Cluster Status” is “Stable”
  7. 10.png
  8. you can also view in GUI console also..
  9. 11.png

so now we have completed NSX manager installation , NSX controller installation and their integration.

Happy Learning 🙂


NSX-T 2.0 – Deploying NSX Manager

NSX-T has been decoupled from vCenter and is availabe for multiple platforms and since lots of things are happening around SDN, their integration with Micro Services running on containers and kubernetes , so it is right to start getting familiar with NSX-T before customer start adopting it.

So first step towards learning NSX-T is to read through official documentation and parallelly start deploying NSX-T 2.0 components…here is the deployment flow that i will follow:

  1. Install NSX Manager.
  2. Install NSX Controllers.
  3. Join NSX Controllers with the management plane.
  4. Initialize the control cluster to create a master controller.
  5. Join NSX Controllers into a control cluster. NSX Manager installs NSX-T modules after the hypervisor hosts are added.
  6. Join hypervisor hosts with the management plane. This causes the host to send its host certificate to the management plane.
  7. Install NSX Edges.
  8. Join NSX Edges with the management plane.
  9. Create transport zones and transport nodes.

So let’s move towards our first step,  deploy NSX Manager….

Here is the System Requirements for NSX-T Manager :
NSX-T has specific requirements regarding hardware resources and software versions. 1.png

for My Lab I am going to use Nested ESXi6.5.

1 – First login to ESXi using HTML5 Client and run the New Virtual Machine wizard and select “Deploy a virtual machine from an OVF or OVA file”

C1.png

Enter the name for the NSX-T Manager appliance (nsxtm.avnlab.com) and choose NSX-T Manager appliance OVA (nsx-unified-appliance-2.0.0.0.0.6522097)

1.png

Select your storage

2.png

Choose your network , Disk type

3.png

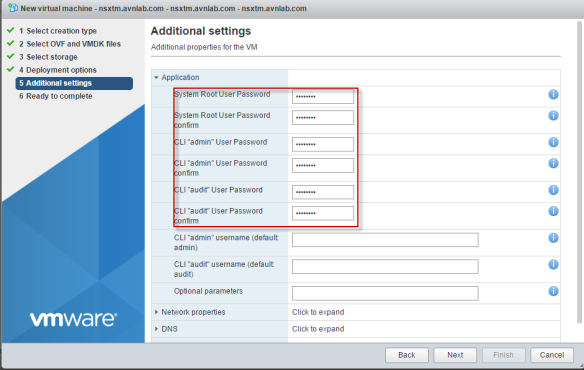
Enter various password for “Root User” , “admin User” and “audit User” , we need to setup a complex password , else it will ask to enter new password post deployment.

NOTE – NSX-T  core services on the appliance will not start until a password with sufficient complexity is set.

Password complexity requirement:

At least eight characters
At least one lower-case letter
At least one upper-case letter
At least one digit
At least one special character
At least five different characters
No dictionary words
No palindromes

4.png

in the same window Enter the “Hostname” , Rolename will be “nsx-manager” don’t change it.

5.png

Enter DNS and NTP server details , enable SSH and root SSH login ( if you required)

6.png

and click finish

7.png

it will take some time and once ova import completes  , you are done.

8.png

Login with IP address that we specified in the installation and Here is your first NSX-T login screen…login with user name “admin” and password that we specified in above steps.11.png

Accept “End User License Agreement” and click on “Continue”

10.png

and here is your first successful NSX-T installation 🙂 Finally, the NSX Manager is deployed.

12.png

Happy Learning 🙂