
VMware Cloud Director Container Service Extension brings Kubernetes as a service to VMware Cloud Director, offering multi-tenant, VMware supported, production ready, and compatible Kubernetes services with Tanzu Kubernetes Grid. As a service provider administrator, you can add the service to your existing VMware Cloud Director tenants. By using VMware Cloud Director Container Service Extension, customers can also use Tanzu products and services such as Tanzu® Mission Control to manage their clusters.
Pre-requisite for Container Service Extension 4.0
- Provider Specific Organization – Before you can configure VMware Cloud Director Container Service Extension server, it is must to create an organization to hosts VMware Cloud Director Container Service Extension server
- Organization VDC within Organization – Container Service extension Appliance will be deployed in this organization virtual data center
- Network connectivity – Network connectivity between the machine where VMware Cloud Director Container Service Extension is installed, and the VMware Cloud Director server. VMware Cloud Director Container Service Extension communicates with VMware Cloud Director using VMware Cloud Director public API endpoint
- CSE 4.0 CPI automatically creates Load balancer, you must ensure that you have configured NSX Advanced Load Balancer, NSX Cloud, and NSX Advanced Load Balancer Service Engine Group for tenants who need to create Tanzu Kubernetes Cluster.
Provider Configuration
With the release of VMware Cloud Director Container Service Extension 4.0, service providers can use the CSE Management tab in the Kubernetes Container Clusters UI plug-in, which demonstrate step by step process to configure the VMware Cloud Director Container Service Extension server.
Install Kubernetes Container Clusters UI plug-in for VMware Cloud Director
You can download the Kubernetes Container Clusters UI plug-in for the VMware Cloud Director Download Page and upload the plug-in to VMware Cloud Director.
NOTE: If you have previously used the Kubernetes Container Clusters plug-in with VMware Cloud Director, it is necessary to deactivate it before you can activate a newer version, as only one version of the plug-in can operate at one time in VMware Cloud Director. Once you activate a new plug-in, it is necessary to refresh your Internet browser to begin using it.
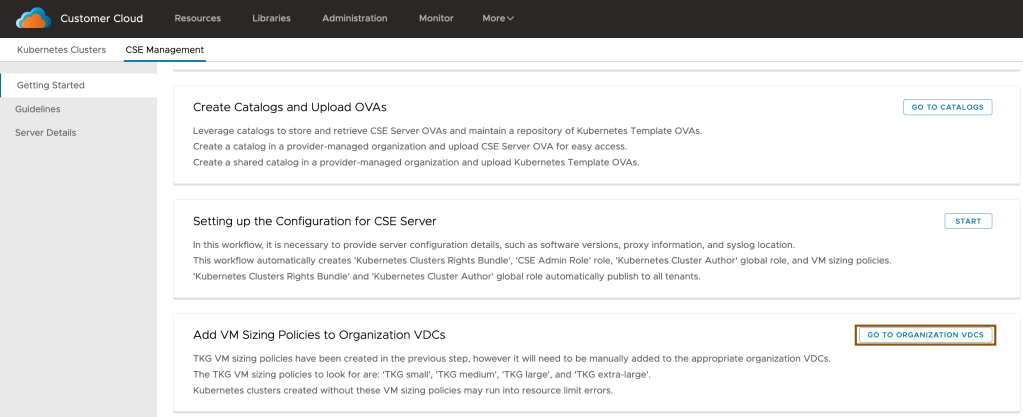
Once partner has installed plugin, The Getting Started section with in CSE Management page help providers to learn and set up VMware Cloud Director Container Service Extension in VMware Cloud Director through the Kubernetes Container Clusters UI plug-in 4.0. At very High Level this is Six Step process:
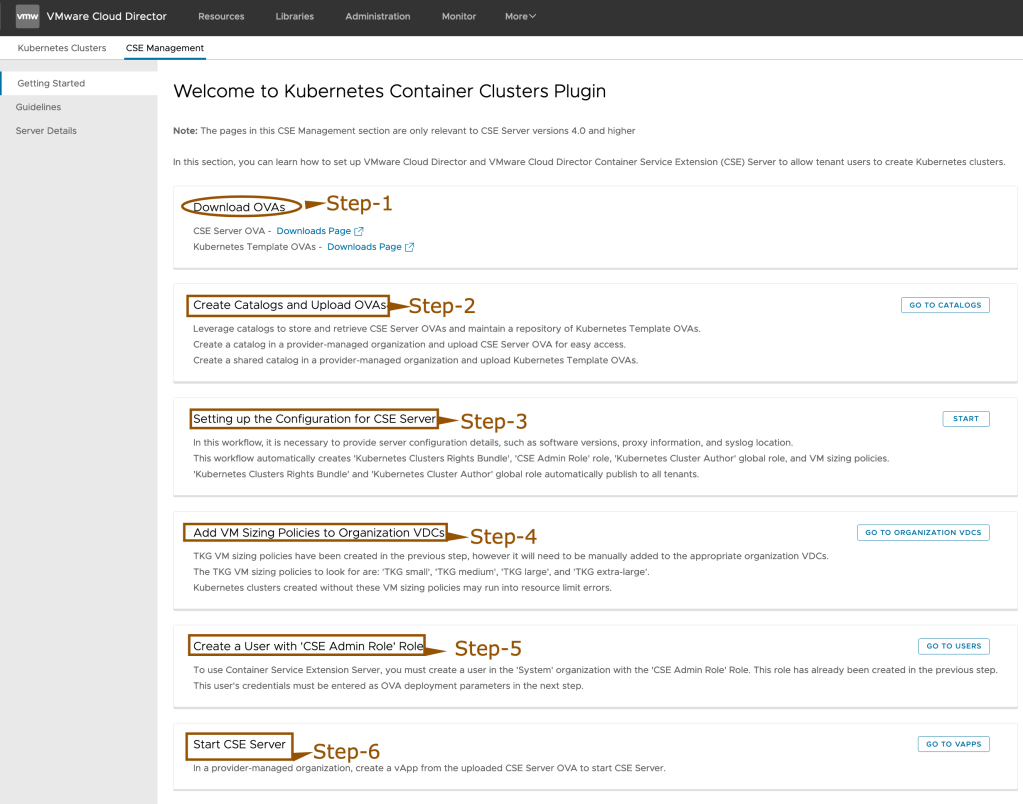
Lets start following these steps and deploy
Step:1 – This section links to the locations where providers can download the following two types of OVA files that are necessary for VMware Cloud Director Container Service Extension configuration:
NOTE- Do not download FIPS enabled templates
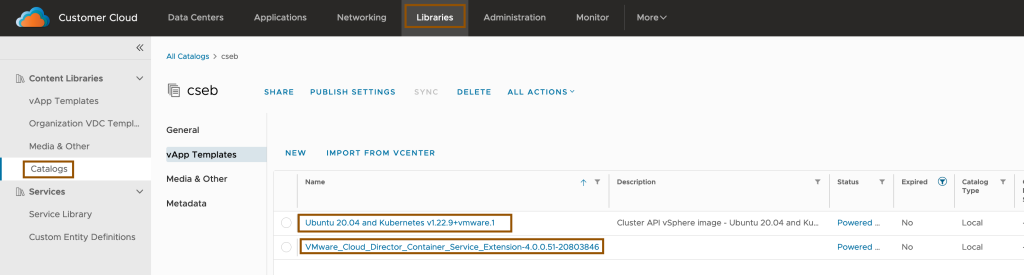
Step:2 – Create a catalog in VMware Cloud Director and upload VMware Cloud Director Container Service Extension OVA files that you downloaded in the step:1 into this catalog
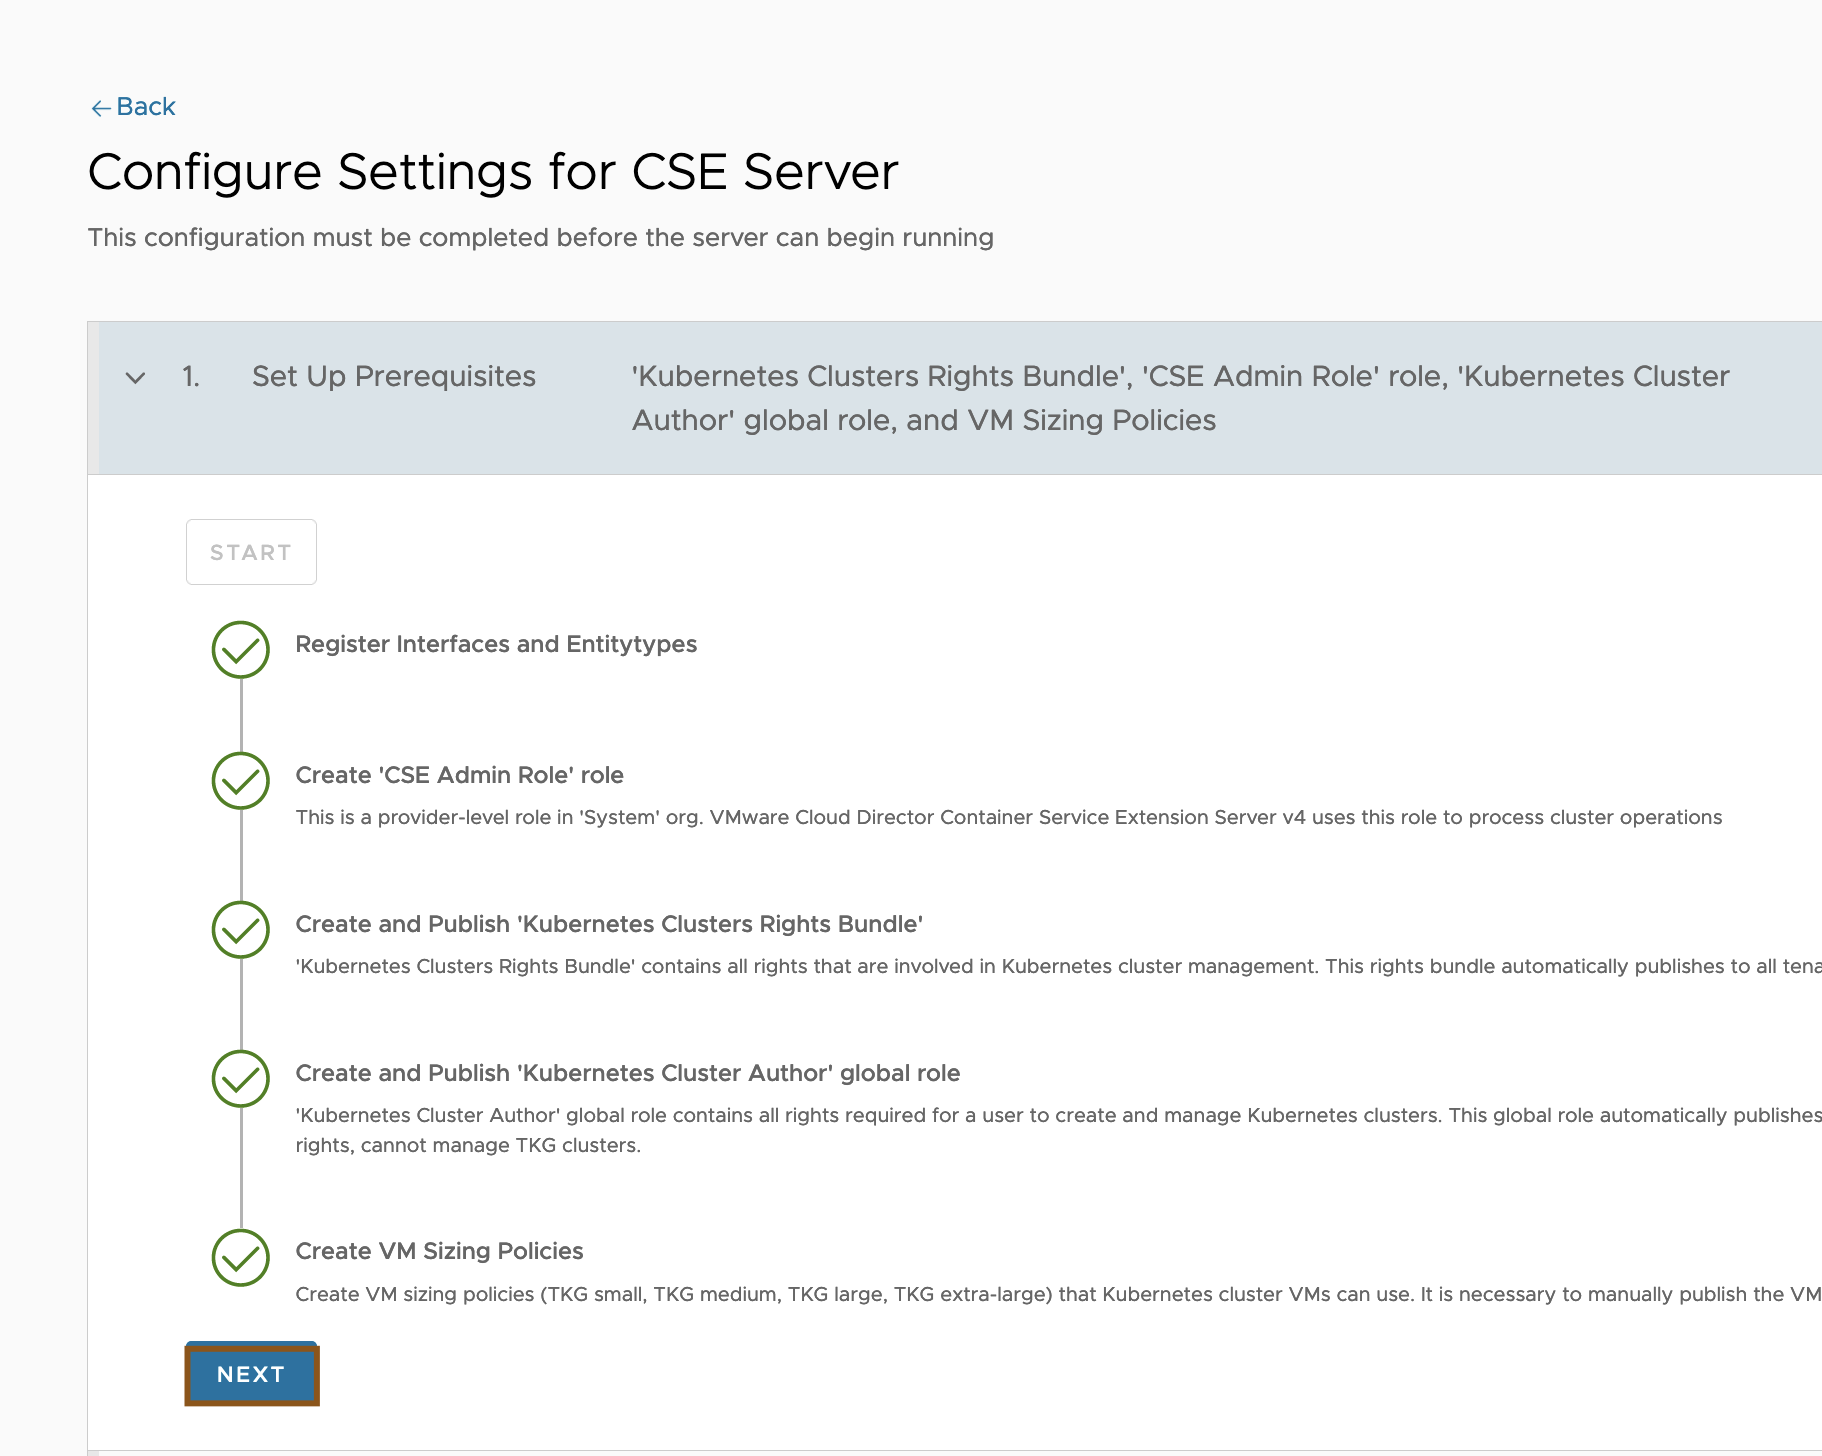
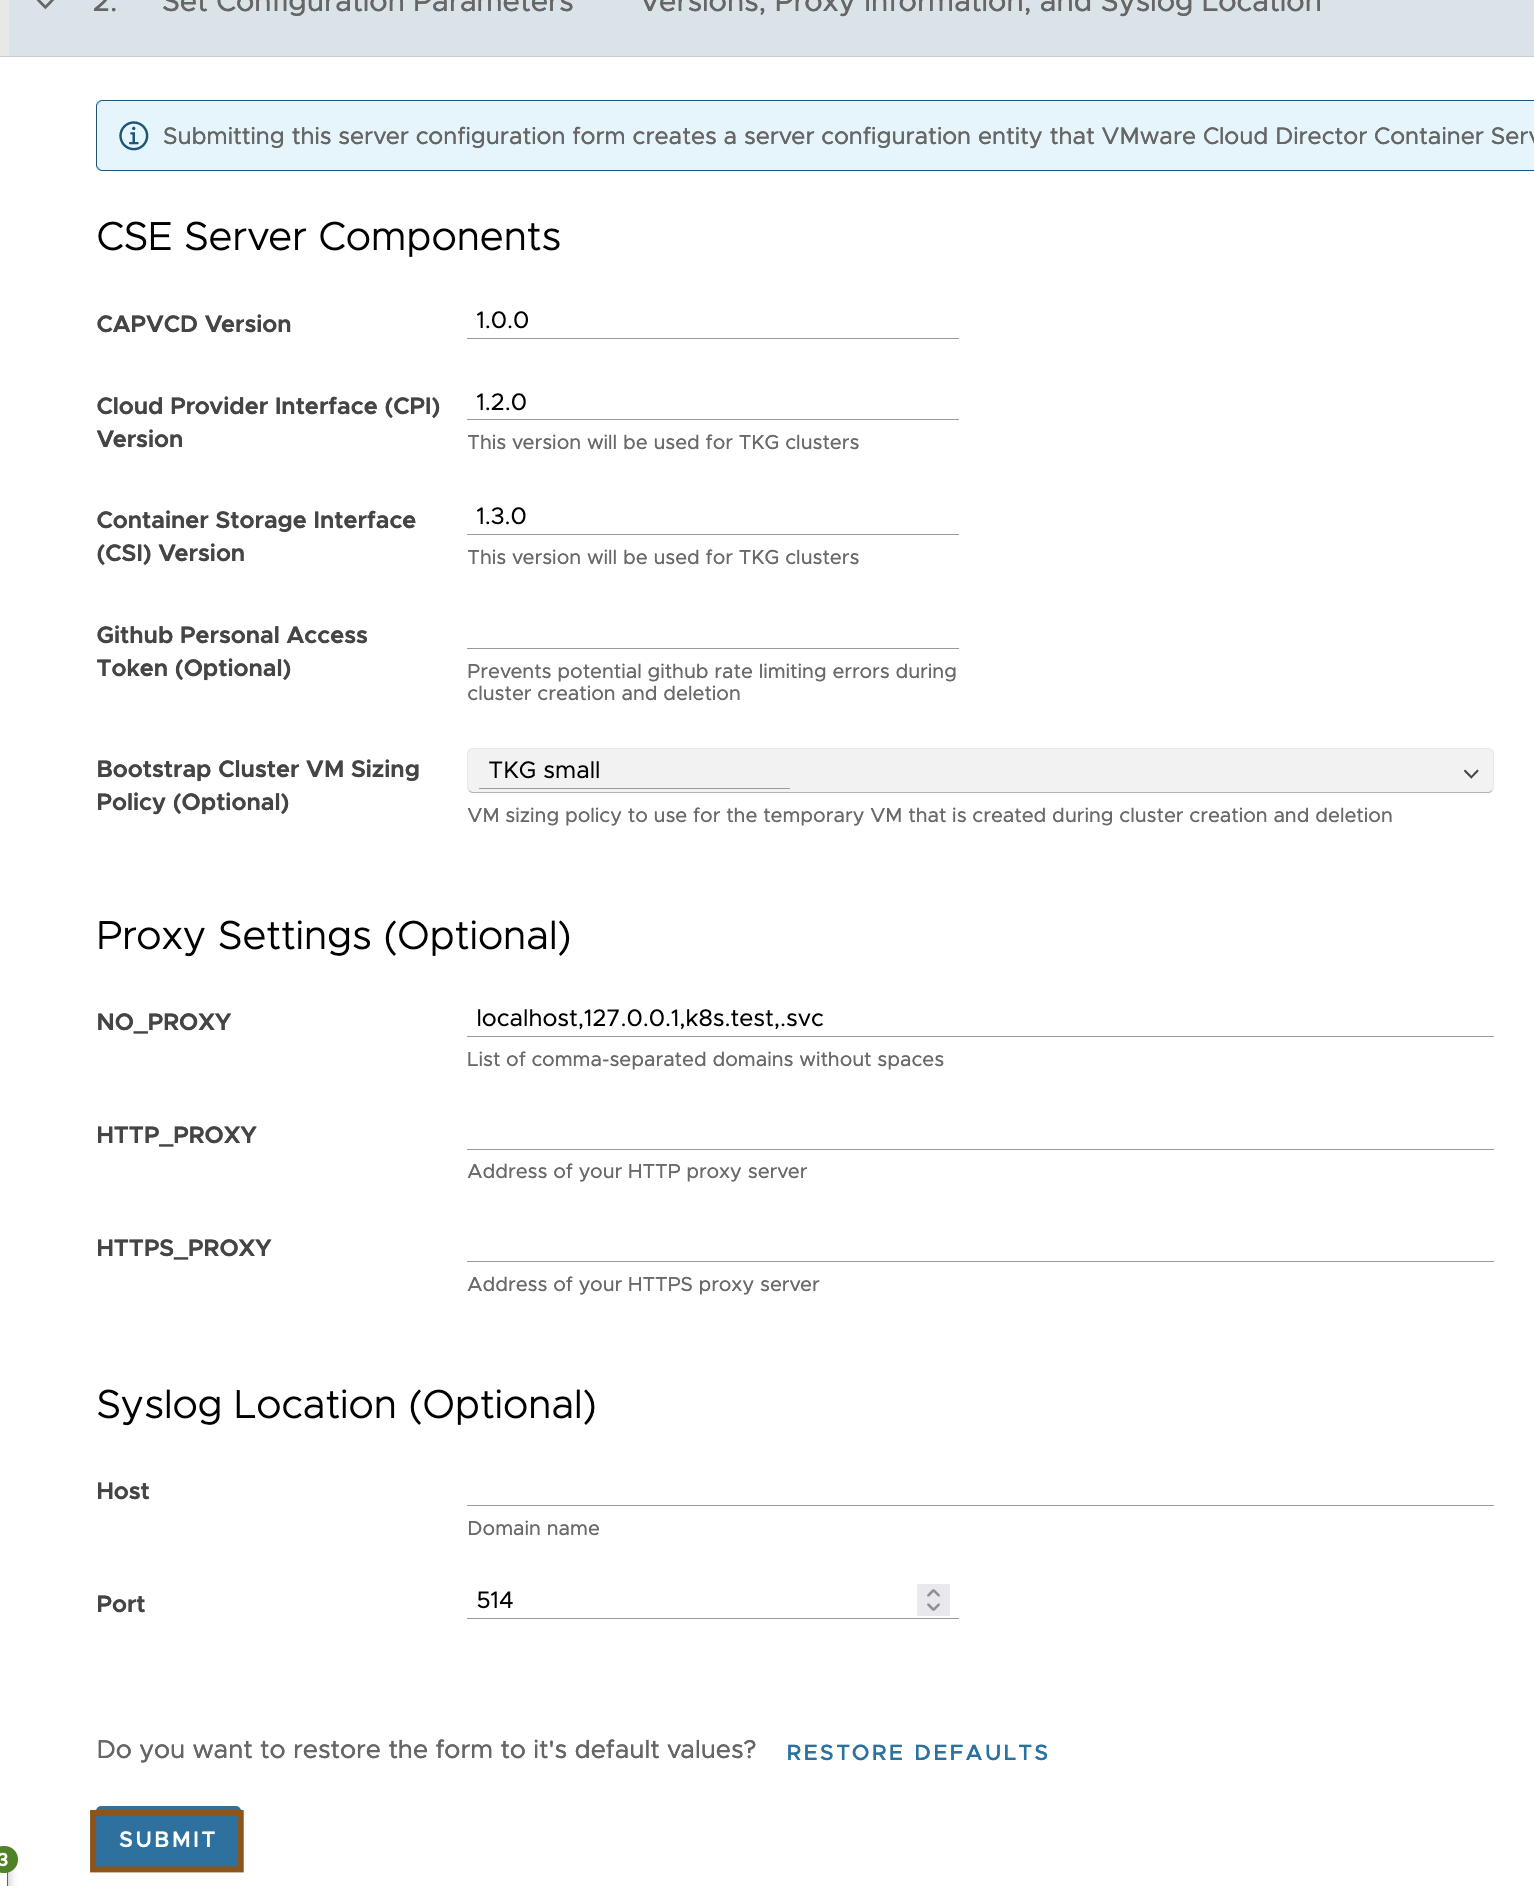
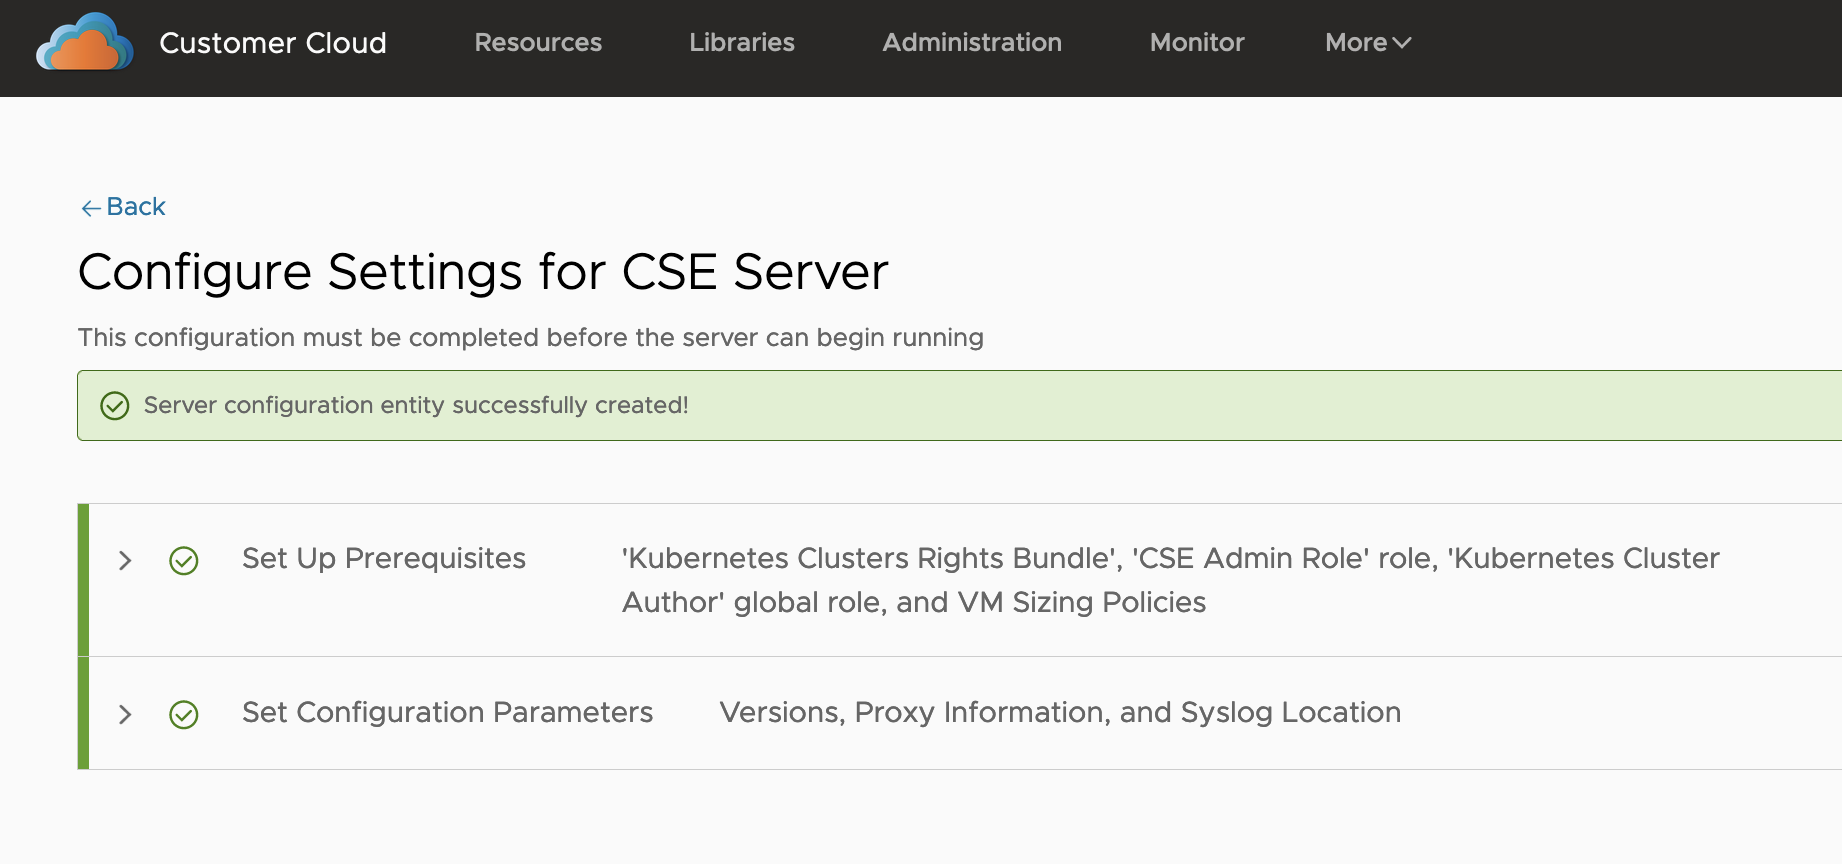
Step:3 – This section initiates the VMware Cloud Director Container Service Extension server configuration process. In this process, you can enter details such as software versions, proxy information, and syslog location. This workflow automatically creates a Kubernetes Clusters rights bundle, CSE Admin Role role, Kubernetes Cluster Author role, and VM sizing policies. In this process, the Kubernetes Clusters rights bundle and Kubernetes Cluster Author role are automatically published to all tenants as well as following Kubernetes resource versions will be deployed
| Kubernetes Resources | Supported Versions |
|---|---|
| Cloud Provider Interface (CPI) | 1.2.0 |
| Container Storage Interface (CSI) | 1.3.0 |
| CAPVCD | 1.0.0 |

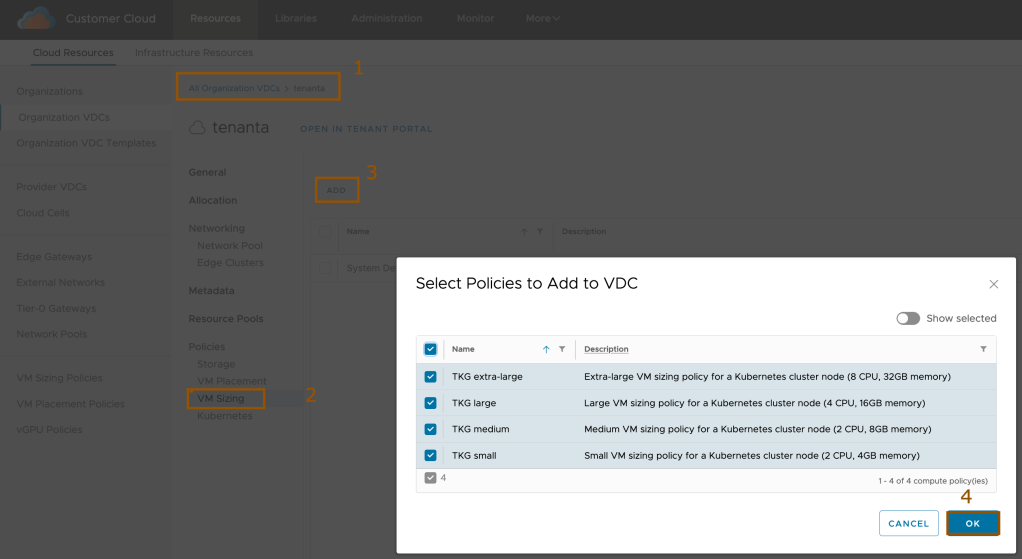
Step:4 – This section links to the Organization VDCs section in VMware Cloud Director, where you can assign VM sizing policies to customer organization VDCs. To avoid resource limit errors in clusters, it is necessary to add Tanzu Kubernetes Grid VM sizing policies to organization virtual data centers.The Tanzu Kubernetes Grid VM sizing policies are automatically created in the previous step. Policies created are as below:
| Sizing Policy | Description | Values |
|---|---|---|
| TKG small | Small VM sizing policy | 2 CPU, 4 GB memory |
| TKG medium | Medium VM sizing policy | 2 CPU, 8 GB memory |
| TKG large | Large VM sizing policy | 4 CPU, 16 GB memory |
| TKG extra-large | X-large VM sizing policy | 8 CPU, 32 GB memory |
NOTE: Providers can create more policies manually based on requirement and publish to tenants
In VMware Cloud Director UI, select an organization VDC, and from the left panel, under Policies, select VM Sizing and Click Add and then from the data grid, select the Tanzu Kubernetes Grid sizing policy you want to add to the organization, and click OK.
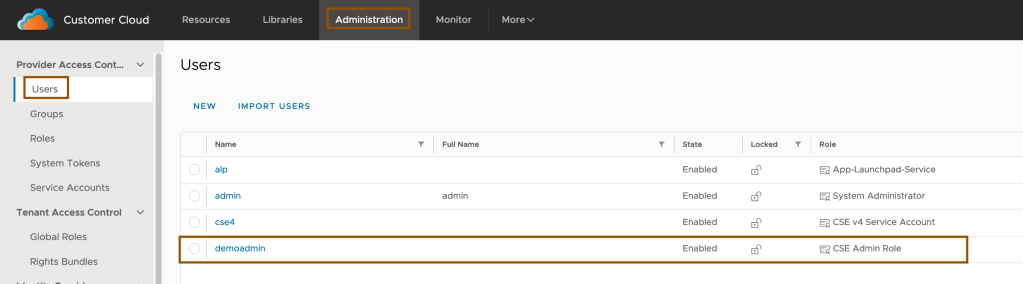
Step:5 – This section links to the Users section in VMware Cloud Director, where you can create a user with the CSE Admin Role role. This role grants administration privileges to the user for VMware Cloud Director Container Service Extension administrative purposes. You can use this user account as OVA deployment parameters when you start the VMware Cloud Director Container Service Extension server.
Step:6 – This section links to the vApps section in VMware Cloud Director where you can create a vApp from the uploaded VMware Cloud Director Container Service Extension server OVA file to start the VMware Cloud Director Container Service Extension server.
- Create a vApp from VMware Cloud Director Container Service Extension server OVA file.
- Configure the VMware Cloud Director Container Service Extension server vApp deployment lease
- Power on the VMware Cloud Director Container Service Extension server.
Container Service Extension OVA deployment

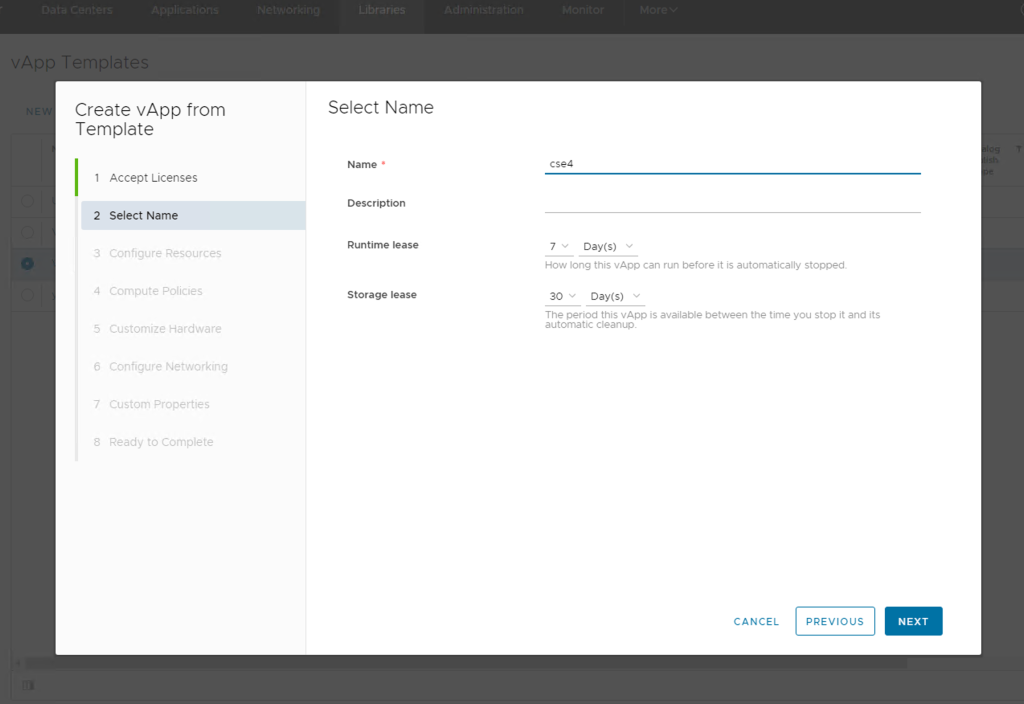
Enter a vApp name, optionally a description, runtime lease and storage lease (should be no lease so that it does not suspend automatically), and click Next.
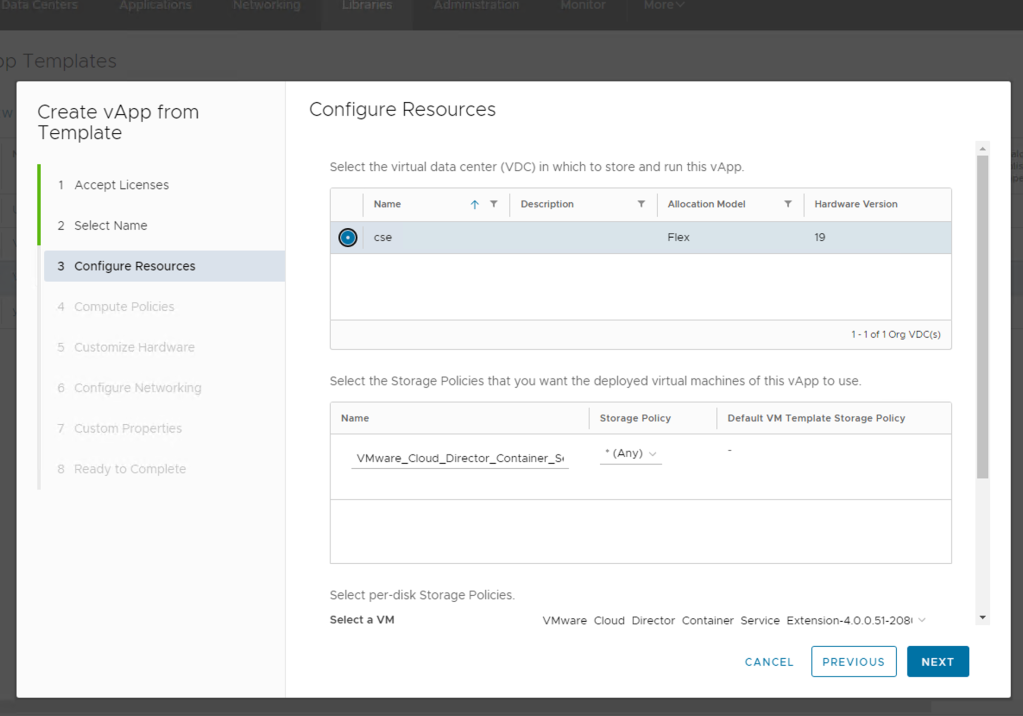
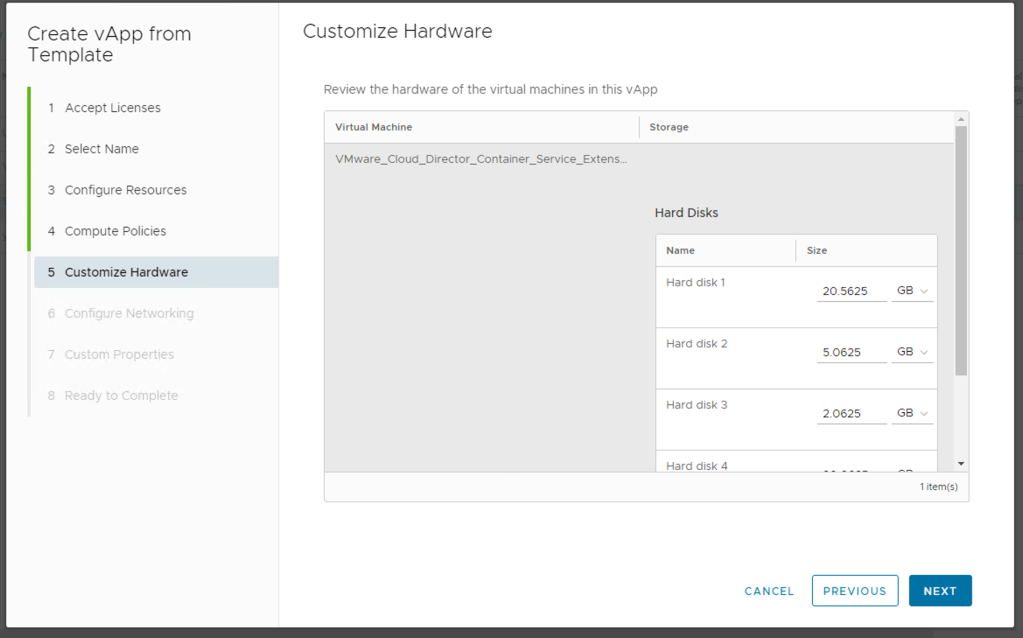
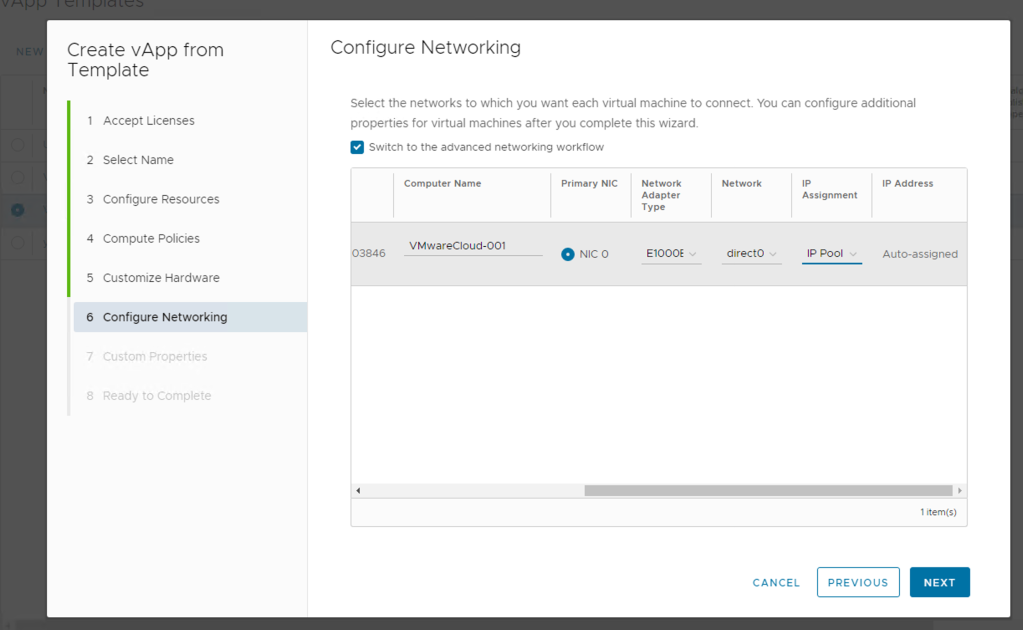
Select a virtual data center and review the default configuration for resources, compute policies, hardware, networking, and edit details where necessary.

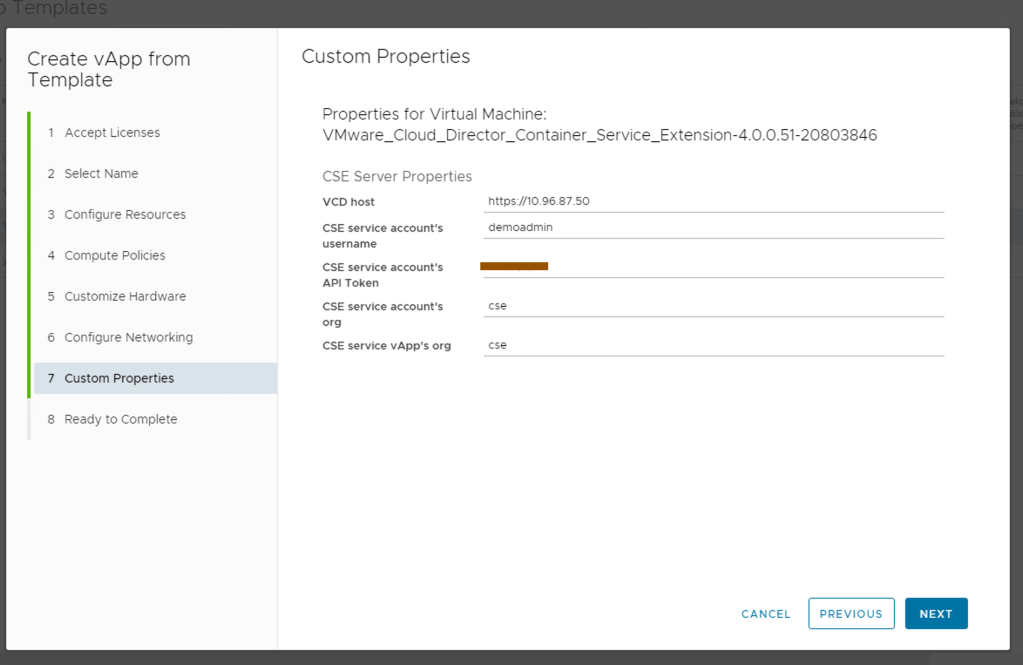
- In the Custom Properties window, configure the following settings:
- VCD host: VMware Cloud Director URL
- CSE service account’s username The username: CSE Admin user in the organization
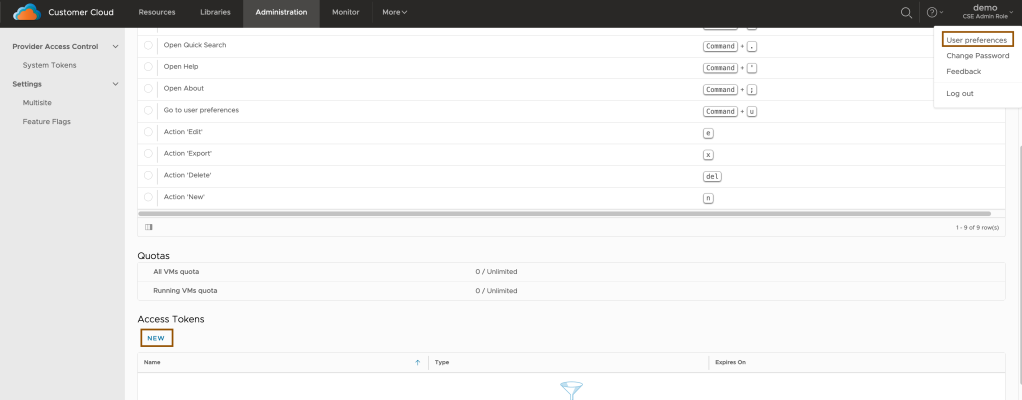
- CSE service account’s API Token: to generate API Token, login to provider session with CSE user which you created in Step:5 and then go to “User Preferences” and click on “NEW” in “ACCESS Tokens” section (When you generate an API Access Token, you must copy the token, because it appears only once. After you click OK, you cannot retrieve this token again, you can only revoke it. )
- CSE service account’s org: The organization that the user with the CSE Admin role belongs to, and that the VMware Cloud Director Container Service Extension server deploys to.
- CSE service vApp’s org: Name of the provider org where CSE app will be deployed
In the Virtual Applications tab, in the bottom left of the vApp, click Actions > Power > Start. this completes the vApp creation from the VMware Cloud Director Container Service Extension server OVA file. This task is the final step for service providers to perform before the VMware Cloud Director Container Service Extension server can operate and start provisioning Tanzu Kubernetes Clusters.
CSE 4.0 is packed with capabilities that address and attract developer personas with an improved feature set and simplified cluster lifecycle management. Users can now build and upgrade versions, resize, and delete K8s clusters directly from the UI making it simpler and faster to accomplish tasks than before. This completes provider section of Container Service extension in next blog post i will write about Tenant workflow.
