VMware Tanzu Kubernetes Grid provides organizations with a consistent, upstream-compatible, regional Kubernetes substrate that is ready for end-user workloads and ecosystem integrations. You can deploy Tanzu Kubernetes Grid across software-defined datacenters (SDDC) and public cloud environments, including vSphere, Microsoft Azure, and Amazon EC2. in this blog post we will deploy Tanzu Kubernetes Grid 1.4 to Azure Native VMs.
Pre-requisite
- Deploy a Client VM ,my case ubuntu VM, this VM will be the bootstrap VM for Tanzu, from where we will deploy management cluster in Azure, you can have one native Azure VM for this.
- TKG uses a local Docker install to setup a small, ephemeral, temporary kind based Kubernetes cluster to build the TKG management cluster in Azure. you need Docker locally to run the kind cluster.
- Download and Unpack the “Tanzu CLI” and “Kubectl” from HERE, on above VM in a new directory named
"tkg" or "tanzu"- unpack using #> tar -xvf
tanzu-cli-bundle-v1.4.0-linux-amd64.tar - After you unpack the bundle file, in your folder, you will see a
clifolder with multiple subfolders and files - Install Tanzu CLI using #> sudo install core/v1.4.0/tanzu-core-linux_amd64 /usr/local/bin/tanzu
- unpack using #> tar -xvf
- Unpack the
kubectlbinary using:- #> tar -xvf kubectl-linux-v1.21.2+vmware.1.gz
- Install kubectl using #> sudo install kubectl-linux-v1.21.2+vmware.1 /usr/local/bin/kubectl
- Run the following command from the
tanzudirectory to install all the Tanzu plugins:- #> tanzu plugin install –local cli all
- #> tanzu plugin list


Configure Azure resources
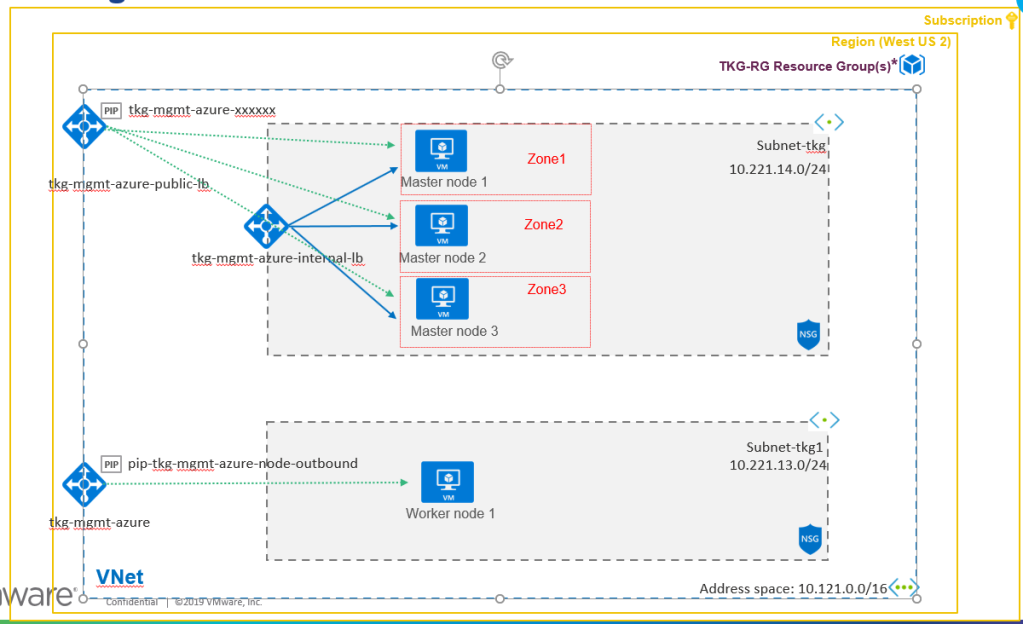
In this section we will prepare Microsoft Azure for running Tanzu Kubernetes Grid, For the networking, i have prepared azure network as below:
- Every Tanzu Kubernetes Grid cluster requires 2 Public IP addresses
- For each Kubernetes Service object with type
LoadBalancer, 1 Public IP address is required. - A VNET with: (only required if using existing VNET else TKG can create all automatically)
- A subnet for the management cluster control plane node
- A Network Security Group on the control plane subnet with Allow TCP over port 22 and 6443 for any source and destination inbound security rules, to enable SSH and Kubernetes API server connections
- One additional subnet and Network Security Group for the management cluster worker nodes.
- Below is the high level network topology will look like when we deploy Tanzu Management Cluster:
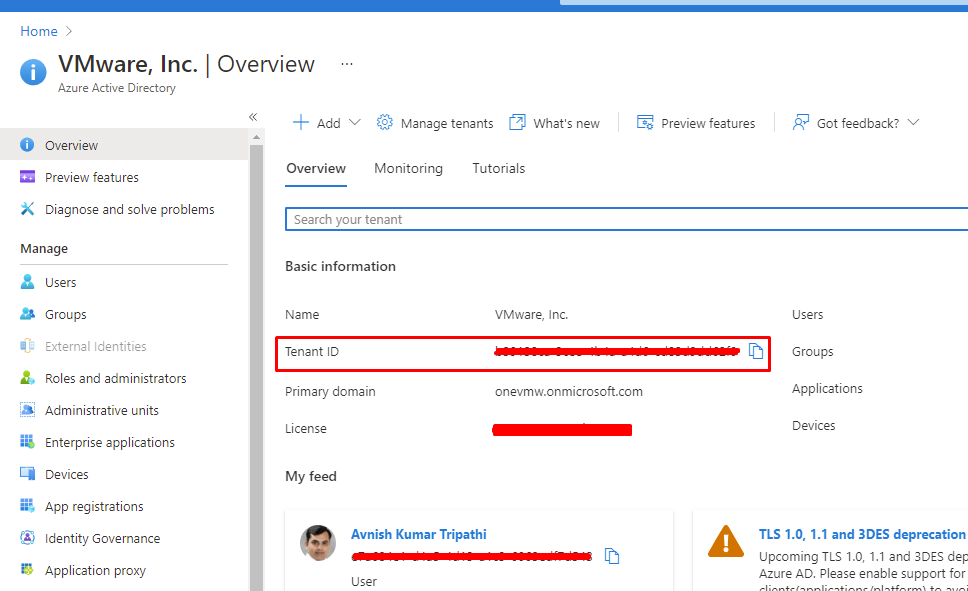
Get Tenant ID
Make a note of the Tenant ID value as it will be used later by hovering over your account name at upper-right, or else browse to Azure Active Directory > <Your Org> > Properties > Tenant ID
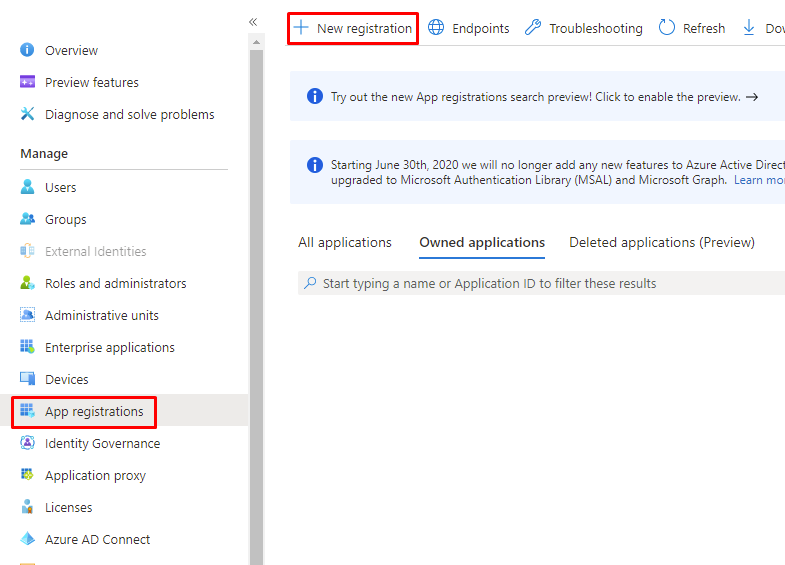
Register Tanzu Kubernetes Grid as an Azure Client App & Get Application (Client) ID
Tanzu Kubernetes Grid manages Azure resources as a registered client application that accesses Azure through a service principal account. Below steps register your Tanzu Kubernetes Grid application with Azure Active Directory, create its account, create a client secret for authenticating communications, and record information needed later to deploy a management cluster.
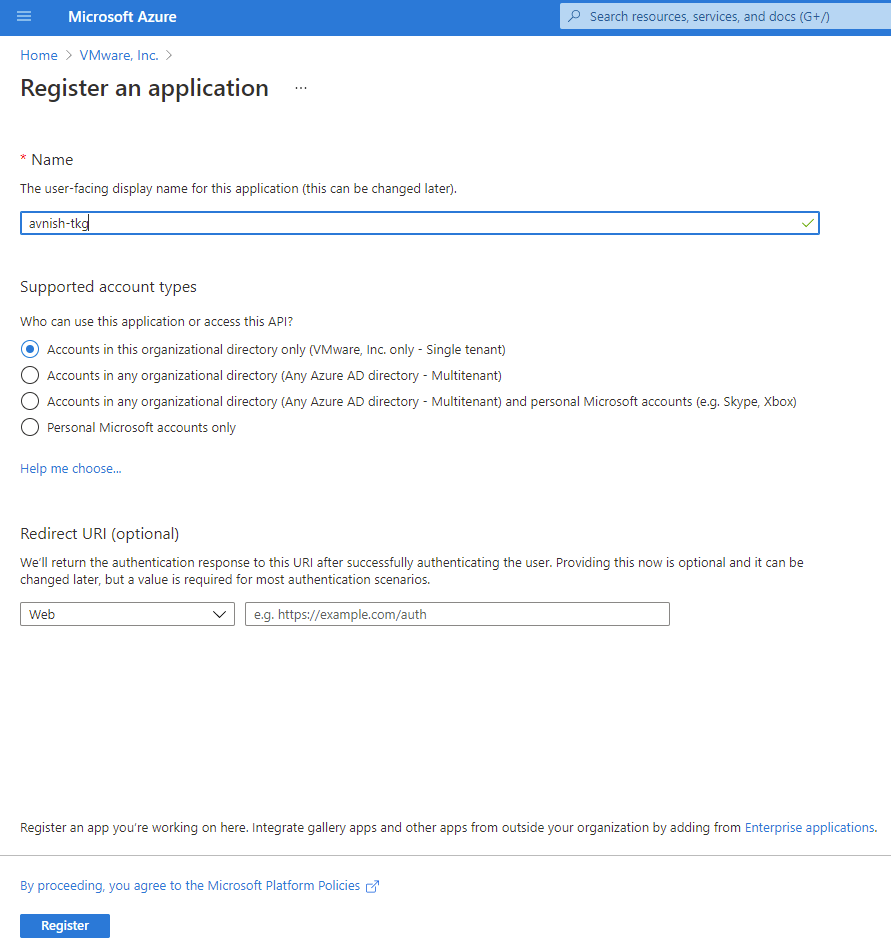
- Go to Active Directory > App registrations and click on + New registration.
- Enter name and select who else can use it. leave Redirect URI (optional) field blank.
- Click Register. This registers the application with an Azure service principal account
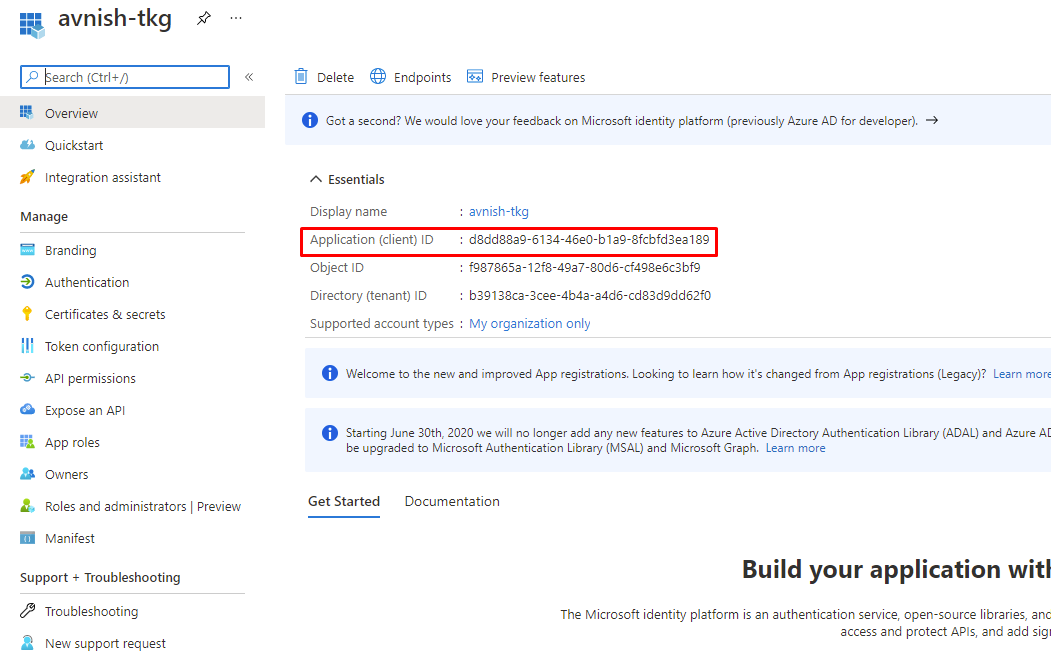
Make a note of the Application (client) ID value, we will use it later.
Get Subscription ID
From the Azure Portal top level, browse to Subscriptions. At the bottom of the pane, select one of the subscriptions you have access to, and make a note of Subscription ID.

Add a Role, Create and Record Secret ID
Click the subscription listing to open its overview pane and Select to Access control (IAM) and click Add a role assignment.
- In the Add role assignment pane
- Select the Owner role
- Select to “user, group, or service principal“
- Under Select enter the name of your app, in my case “avnish-tkg”. It appears under Selected Members
- Click Save. A popup appears confirming that your app was added as an owner for your subscription. You can also verify by going in to “Owned Application” section.


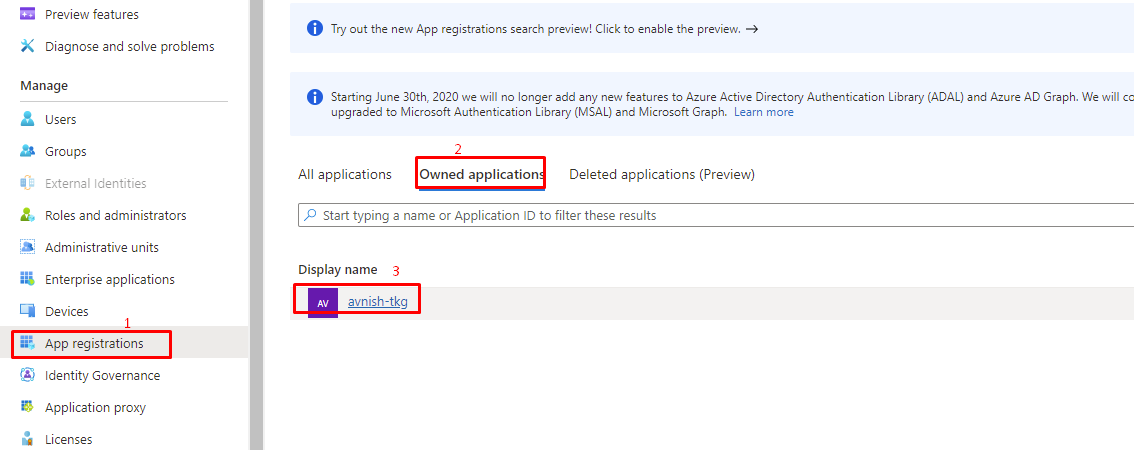
- On the Azure Portal go to Azure Active Directory, click on App Registrations, select your “avnish-
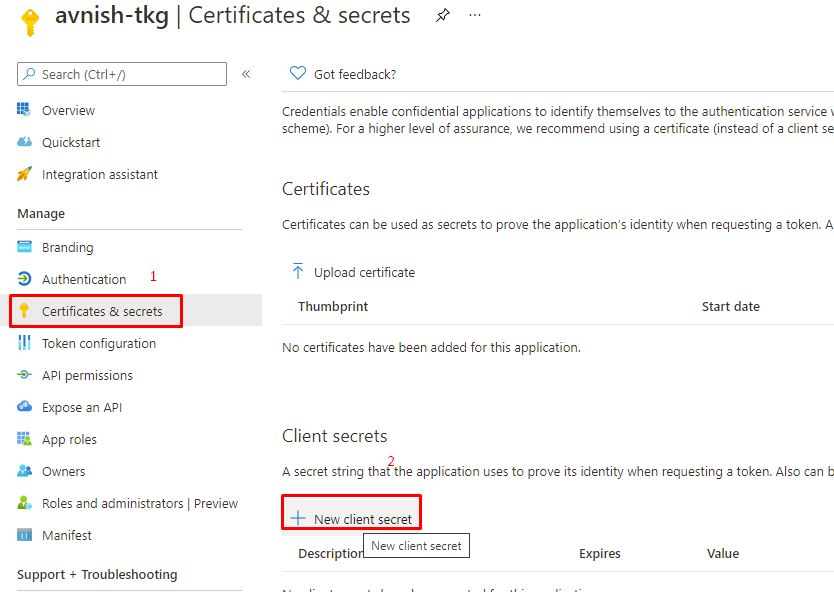
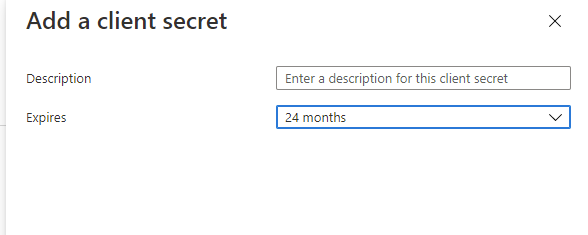
tkg” app under Owned applications. - Go to Certificates & secrets then in Client secrets click on New client secret.
- In the Add a client secret popup, enter a Description, choose an expiration period, and click Add.
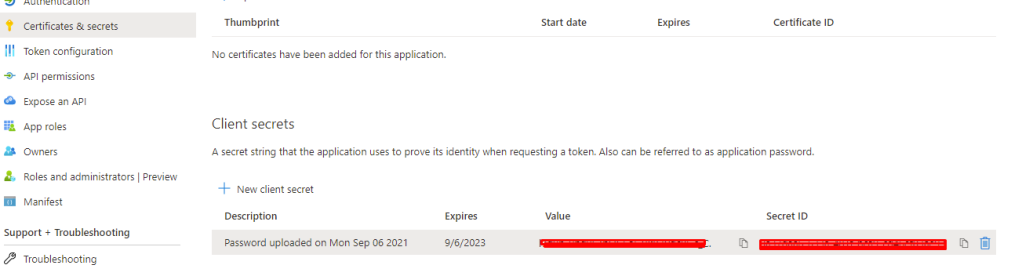
- Azure lists the new secret with its generated value under Client Secrets. take a note of “Client Secret” value, which we will use later.
With All above steps, we will have four recorded values:
Subscription ID – XXXXXXX-XXX-4853-9cff-3d2d25758b70
Application Client ID – XXXXXXXX-6134-xxxx-b1a9-8fcbfd3ea189
Secret Value – XXXXX-xxxxxxxxxxxxxxxkB3VdcBF.c_C.
Tenant ID – XXXXXXXX-3cee-4b4a-a4d6-xxxxxdd62f0
we will use these values when we will create management cluster.
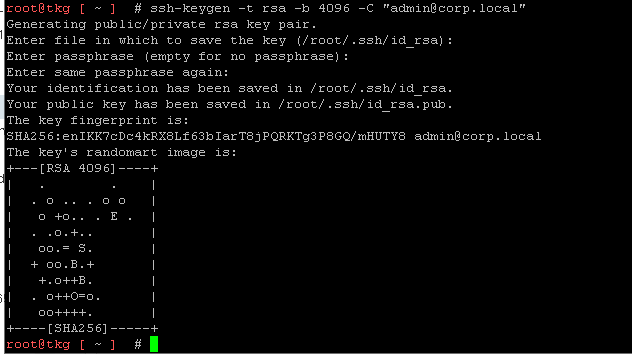
Create an SSH Key-Pair
To connect to management azure machine we must need to provide the public key part of an SSH key pair. you can use a tool "ssh-keygen" to generate one
- #>ssh-keygen -t rsa -b 4096 -C “email@example.com“
- At the prompt
Enter file in which to save the key (/root/.ssh/id_rsa):press Enter to accept the default - Enter and repeat a password for the key pair
Copy the content of .ssh/id_rsa.pub, which we will use in next section.

Accept Base VM image license
To run management cluster VMs on Azure, accept the license for their base Kubernetes version and machine OS by logging to azure cell and run below commands:
#> az login --service-principal --username AZURE_CLIENT_ID --password AZURE_CLIENT_SECRET --tenant AZURE_TENANT_ID

AZURE_CLIENT_ID, AZURE_CLIENT_SECRET, and AZURE_TENANT_ID are your avnish-tkg app's client ID and secret and your tenant ID, as recorded above

#> az vm image terms accept --publisher vmware-inc --offer tkg-capi --plan k8s-1dot21dot2-ubuntu-2004 --subscription AZURE_SUBSCRIPTION_ID

In Tanzu Kubernetes Grid v1.4.0, the default cluster image --plan value is k8s-1dot21dot2-ubuntu-2004.


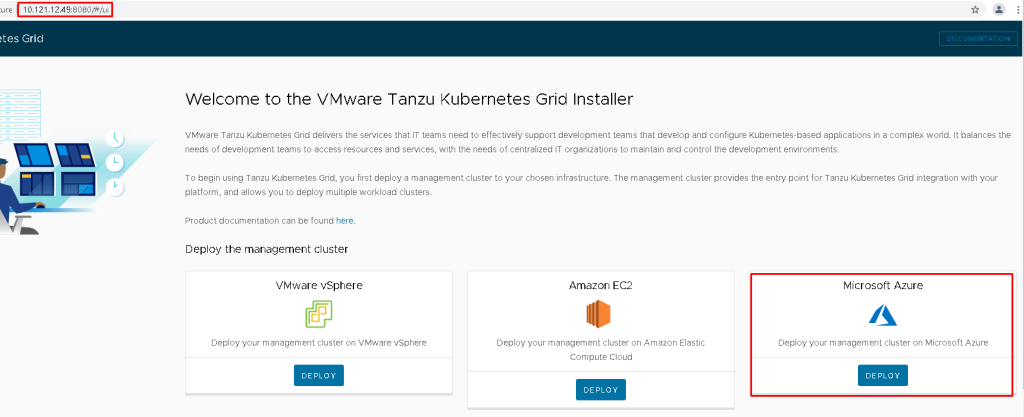
Start the Installer Interface
On the machine on which you downloaded and installed the Tanzu CLI, run the
#> tanzu management-cluster create -b "IP of this machine:port" -u

b = binding with interface
u = for User Interface

On the local machine, browse to the above machine’s IP address to access the installer interface and then choose “Microsoft Azure” and click on “DEPLOY”
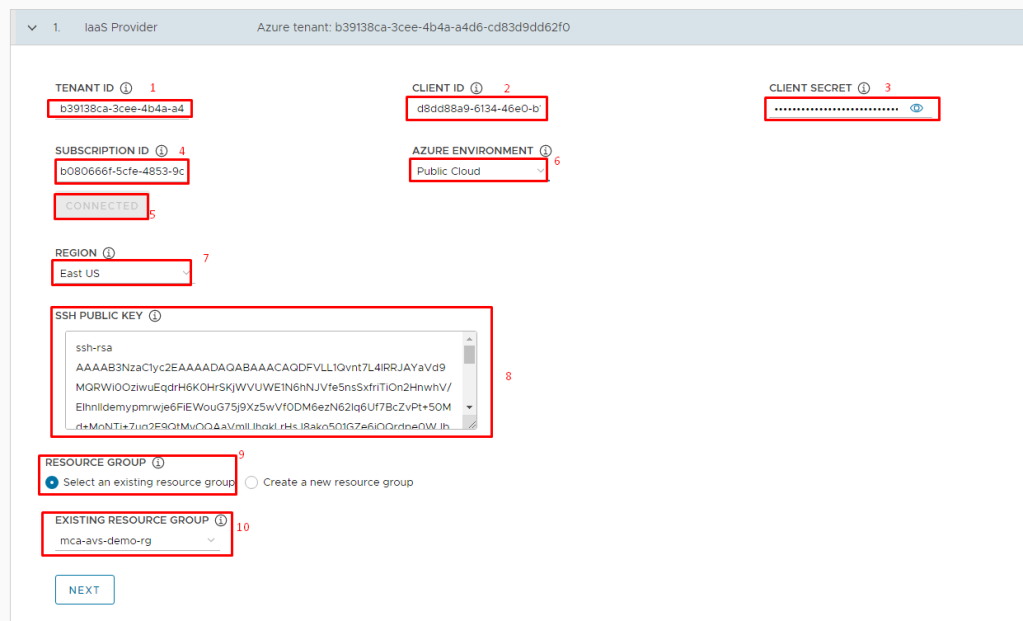
In the IaaS Provider section, enter the Tenant ID, Client ID, Client Secret, and Subscription ID values for your Azure account. we recorded these values in above pre-requisite section.
- Click Connect. The installer verifies the connection and changes the button label to Connected.
- Select the Azure region in which to deploy the management cluster.
- Paste the contents of your SSH public key,
".ssh/id_rsa.pub“, into the text box. - Under Resource Group, select either the Select an existing resource group or the Create a new resource group radio button.
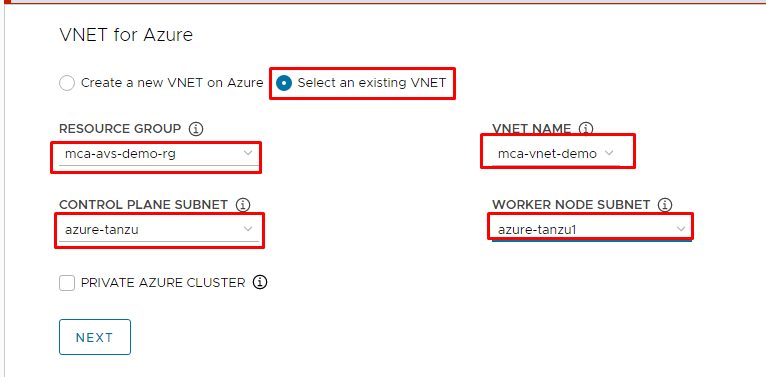
In the VNET for Azure section, select either the Create a new VNET on Azure or the Select an existing VNET radio button, in my case i am using existing VNET and Subnets which i had provisioned already.
To make the management cluster private, enable the Private Azure Cluster checkbox or leave it Untick. By default, Azure management and workload clusters are public. But you can also configure them to be private, which means their API server uses an Azure internal load balancer (ILB) and is therefore only accessible from within the cluster’s own VNET or peered VNETs.
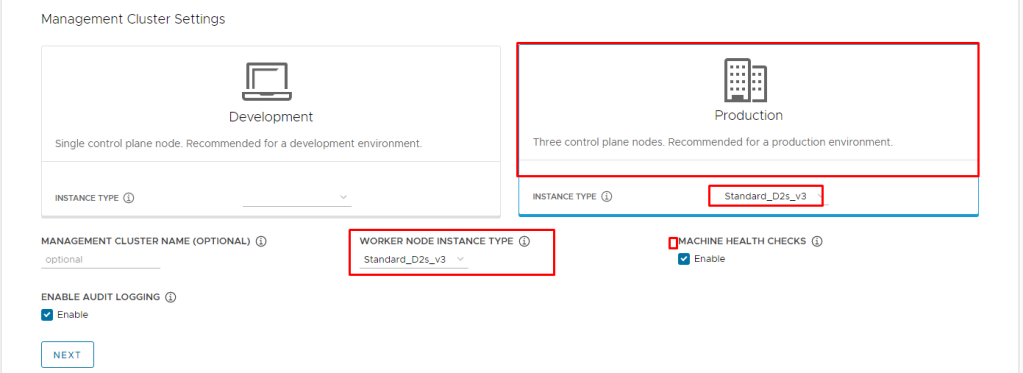
In Management Cluster Settings section choose Development or Production tiles, use the Instance type drop-down menu to select from different combinations of CPU, RAM, and storage for the control plane node VM or VMs.
Under Worker Node Instance Type, select the configuration for the worker node VM
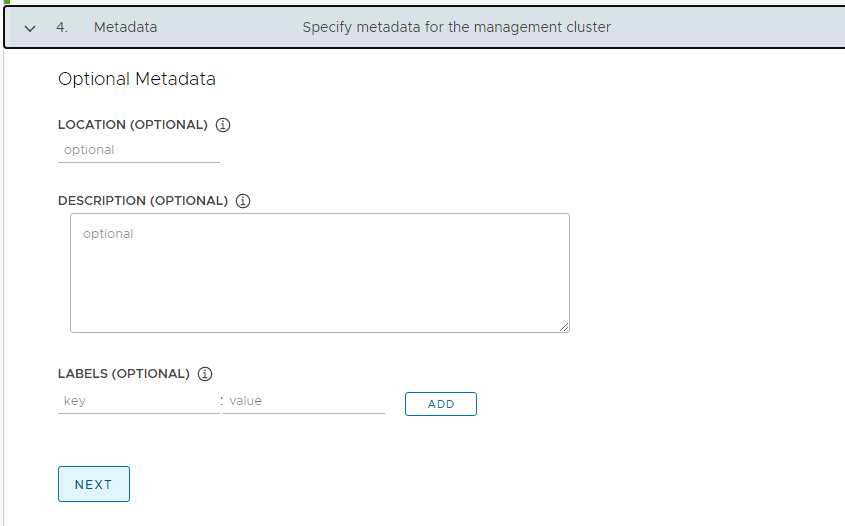
In the optional Metadata section, optionally provide descriptive information about this management cluster.
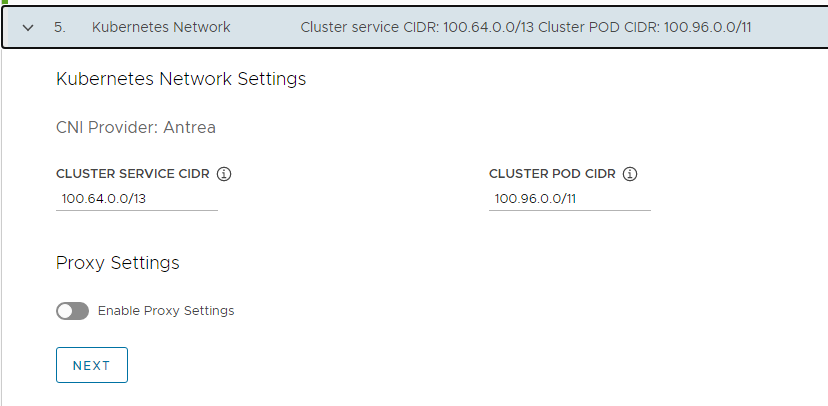
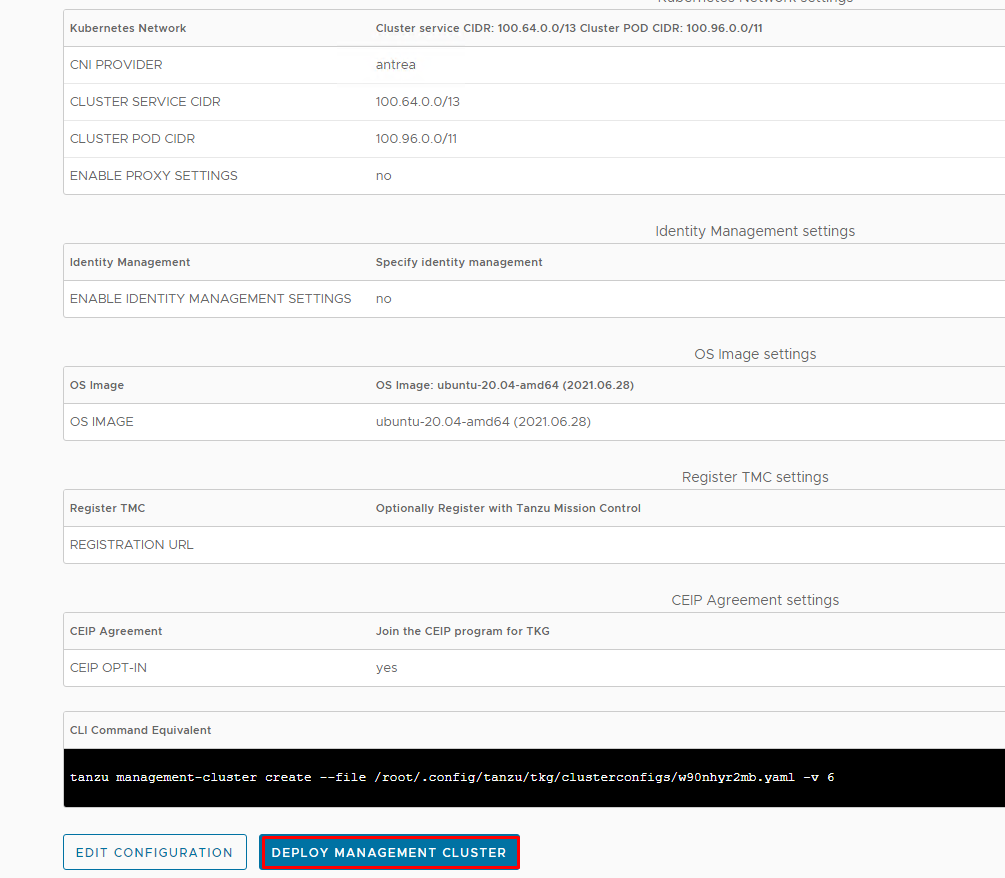
in Kubernetes Network section check the default Cluster Service CIDR and Cluster Pod CIDR ranges. If these CIDR ranges of 100.64.0.0/13 and 100.96.0.0/11 are not available, change the values under Cluster Service CIDR and Cluster Pod CIDR.
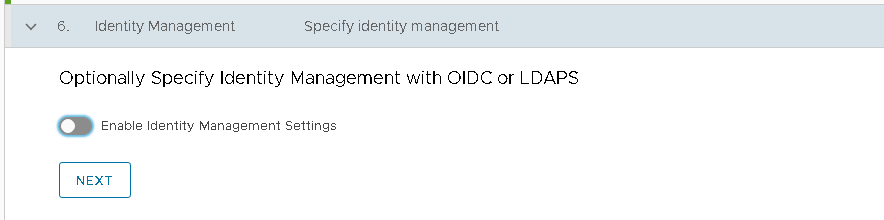
In Identity Management section, enable/disable Enable Identity Management Settings based on your use case.
In OS Image section, select the OS and Kubernetes version image template to use for deploying Tanzu Kubernetes Grid VMs, and click Next

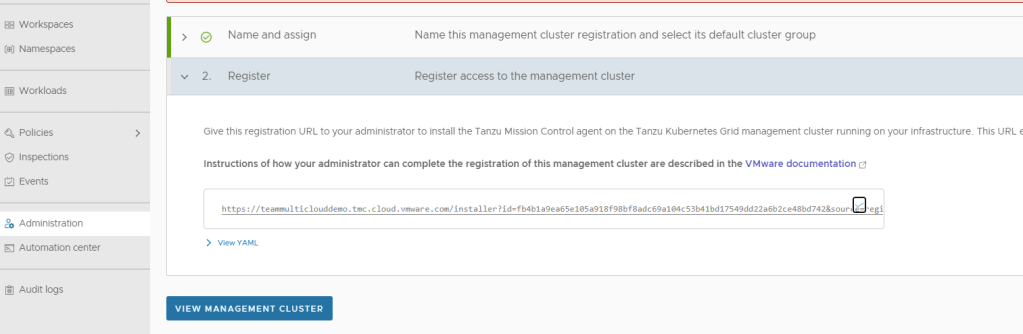
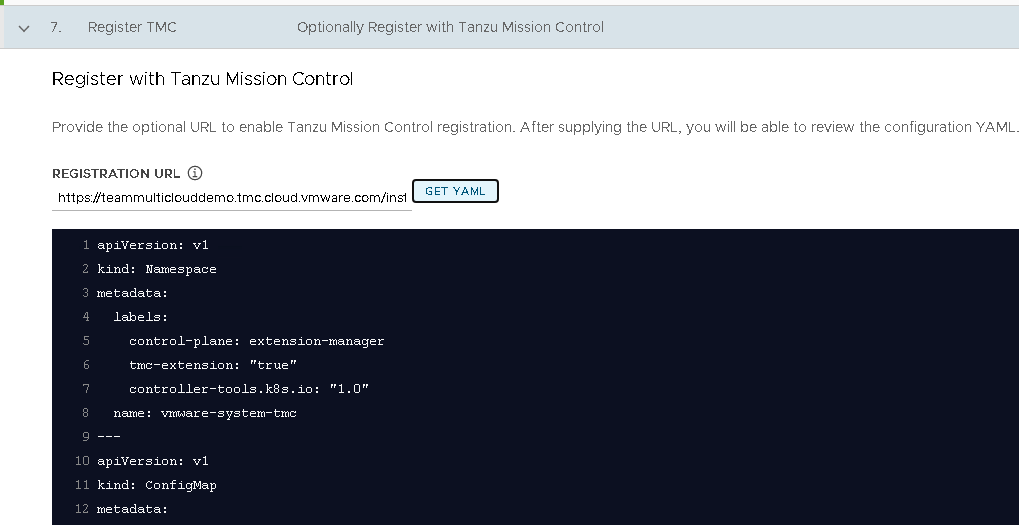
In the Registration URL field, copy and paste the registration URL you obtained from Tanzu Mission Control or if you don’t have TMC access or URL, move next you can register it later if you want.
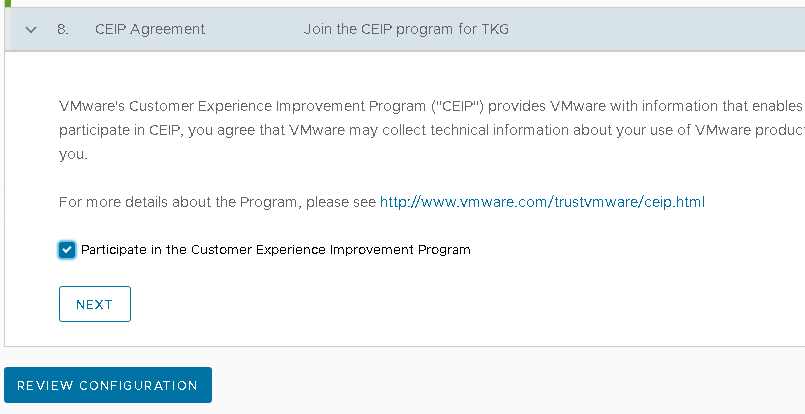
In the CEIP Participation section, optionally deselect the check box to opt out of the VMware Customer Experience Improvement Program and then Click Review Configuration to see the details of the management cluster that we have configured.
and finally click on Deploy Management Cluster.
Deployment of the management cluster can take several minutes, in my case around 12 minutes.
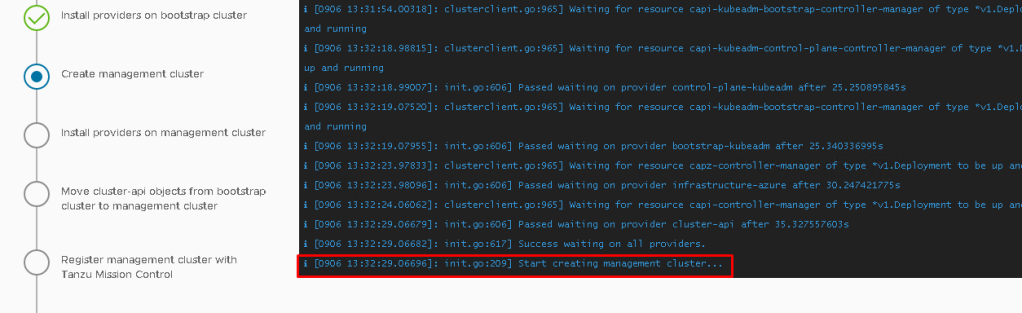
and finally, once everything is deployed and configured. your “Management Cluster Created”
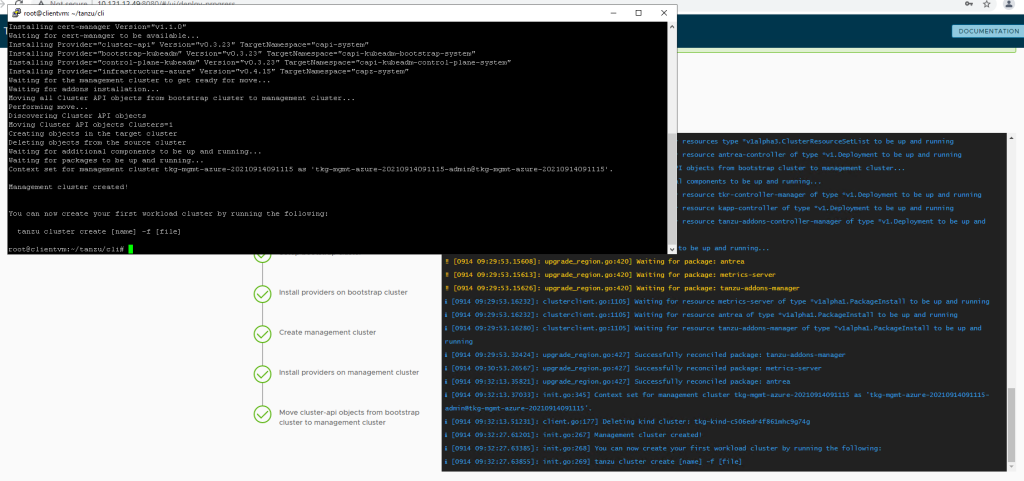
The installer saves the configuration of the management cluster to ~/.config/tanzu/tkg/clusterconfigs with a generated filename of the form UNIQUE-ID.yaml. After the deployment has completed, you can rename the configuration file to something memorable,
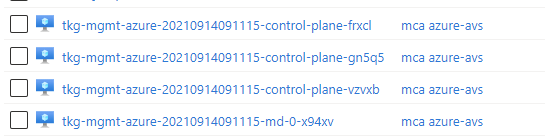
if you go to azure portal, you should see three control plane VMs, for with names similar to CLUSTER-NAME-control-plane-abcde, one or three worker node VMs with name similar to CLUSTER-NAME-md-0-rh7xv, Disk and Network Interface resources for the control plane and worker node VMs, with names based on the same name patterns.
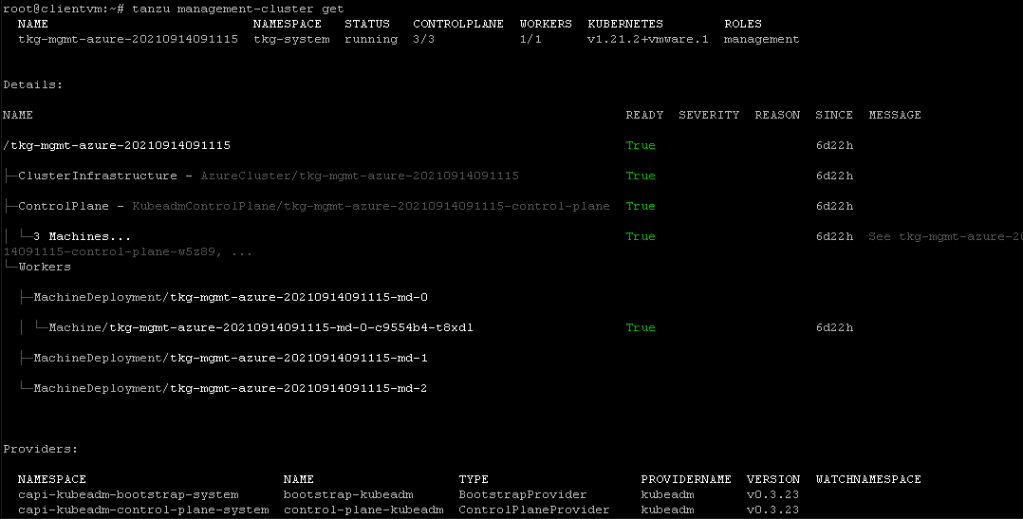

At this point we can see management cluster deployed successfully, now we can go ahead and create workload clusters based on your requirement easily. Tanzu allows to deploy and manage Kubernetes cluster on vSphere, on VMware on public clouds and native public cloud AWS and Azure native, in next post i will deploy Tanzu on AWS.