My VCAP-DCD Exam experience

After a series of reschedules, finally when i again tried to reschedule yesterday, it did not allowed as i was trying to reschedule within 24 hours of scheduled, that is not allowed, so finally  I had to sit for VCAP-DCD exam this week and I passed it. I needed this exam passed to be eligible for VCDX path since I am already a VCAP-DCA since 2014. It was my second attempt after I failed VCAP-DCD back in middle of 2015. it was long time due but did not had courage to sit again as this is one of the hardest exam i have ever given. you get a design canvas and you have to fit lots of objects in that canvas and then connect with with various connectors and most important thing is that questions are so very trick and lots of design decisions hidden on those tricks words.

The content of certain questions are still completely disconnected from typical project realities but altogether it is now clear that exam creators want to test analytical and abstract thinking instead of checking against simple memorized content. That is the reason why I value VCAP exams so much.

It took a lot of time and a lot of effort but in the end it was worth it.

SO, NOW I AM vExpert 2016

I am delightfully honoured to share with you that I have been designated as VMware vExpert 2016. I am truly happy and would like to thank all bloggers, contributors, readers and customers for letting me achieve that 🙂

VMW-LOGO-vEXPERT-2016-k-624x90

here is the list…

http://blogs.vmware.com/vmtn/2016/08/vexpert-2016-second-half-announcement.html

vRA URL Redirection using NSX LB


When accessing vRealize Automation, the FQDN of the vRA appliance in the browser will take you to a page that looks like this

1.png

though this can be useful page when first getting started but it is not exactly what customer want end users to see when trying to access the vRA portal. It can be particularly troublesome if they use the link to access the vRA portal and they should be using a specific tenant URL.

Lets add a redirect that will directly send them to the login page. we will archive this using  NSX edge LB Application rules.

Open the NSX edge which is working as LB and go to Application Rules and Click on green “+”  to add a rule like this:

2

Save this and add to your vRA VIP.

This will help your end users will go straight to the login page when pointing their browser to the FQDN of the vRA appliance.

Learn NSX – Part-05 (NSX Controller)

Friends, In my Previous NSX series posts , we have successfully deployed NSX Manager , now to move on further , Next thing is deploy NSX controllers , in this post i will explain you what is the role of NSX controllers and next post we will deploy Controller cluster.

The NSX Controller cluster is the control plane component that is responsible for managing the switching and routing modules in the hyper-visors.The controller cluster consists of controller nodes that manage specific logical switches. The use of controller cluster in managing VXLAN based logical switches eliminates the need for multicast configuration at the physical layer for VXLAN overlay.

NSX Controller nodes perform the following functions:

  • Provides control plane to distribute VXLAN and logical routing information to ESXi hosts.
  • Nodes are clustered for scale-out and high availability.
  • Network information is sliced across nodes in a cluster for redundancy purposes.
  • Eliminates the need for multicast support from the physical network infrastructure.
  • Provides ARP-suppression of broadcast traffic in VXLAN networks.

NSX Controller nodes are deployed in a cluster with a minimum of three members to provide high availability and scale.The high availability of NSX Controller reduces downtime in the case of one physical host failure.

Below information has been taken from NSX Reference Design.

For resiliency and performance, production deployments of controller VM should be in three distinct hosts. The NSX controller cluster represents a scale-out distributed system, where each controller node is assigned a set of roles that define the type of tasks the node can implement.In order to increase the scalability characteristics of the NSX architecture, a slicing mechanism is utilized to ensure that all the controller nodes can be active at any given time.

1

Above Figure illustrates the distribution of roles and responsibilities between all three cluster nodes. This demonstrates how distinct controller nodes act as master for given entities such as logical switching, logical routing and other services. Each node in the controller cluster is identified by a unique IP address. When an ESXi host establishes a control-plane connection with one member of the cluster, a full list of IP addresses for the other members is passed down to the host. This enables establishment of communication channels with all members of the controller cluster, allowing the ESXi host to know at any given time which specific node is responsible for any given logical network.

In the case of failure of a controller node, the slices owned by that node are reassigned to the remaining members of the cluster. In order for this mechanism to be resilient and deterministic, one of the controller nodes is elected as a master for each role. The master is responsible for allocating slices to individual controller nodes, determining when a node has failed, and reallocating the slices to the other nodes. The master also informs the ESXi hosts about the failure of the cluster node so that they can update their internal node ownership mapping.

The election of the master for each role requires a majority vote of all active and inactive nodes in the cluster. This is the primary reason why a controller cluster must always be deployed with an odd number of nodes.

                                2

Above figure highlights the different majority number scenarios depending on the number of available controller nodes. In a distributed environment, node majority is required. During the failure of one the node, with only two nodes working in parallel, the majority number is maintained. If one of those two nodes were to fail or inter-node communication is lost (i.e., dual-active scenario), neither would continue to function properly. For this reason, NSX supports controller clusters with a minimum configuration of three nodes. In the case of second node failure the cluster will have only one node. In this condition controller reverts to read only mode. In this mode, existing configuration should continue to work however any new modification to the configuration is not allowed.

NSX controller nodes are deployed as virtual appliances from the NSX manager UI. Each appliance communicates via a distinct IP address. While often located in the same subnet as the NSX manager, this is not a hard requirement. Each appliance must strictly adhere to the specifications in below table.

  Per Controller VM Configurations
No. of Controller VMs vCPU Reservation Memory OS Disk
3 4 2048 MHz 4GB 20 GB

It is recommended to spread the deployment of cluster nodes across separate ESXi hosts. This ensure that the failure of a single host does not cause the loss of a majority number in the cluster. you can leverage the native vSphere anti-affinity rules to avoid deploying more than one controller node on the same ESXi server.

In the Next post we will learn how to deploy NSX controllers….:)

vRealize Network Insight (vRNI)

VMware vRealize Network Insight 3.0.0 (Arkin) is now generally available. vRNI delivers intelligent operations for software-defined networking and security, with converged visibility across virtual and physical networks, planning and recommendations for micro-segmentation and operations management for NSX.vRealize Network Insight provides converged operations plane between virtual and physical network.

Benefits of vRNI

–Increase speed and accuracy of micro-segmentation deployment

–Rapidly operationalize NSX environments with out of the box best practice

–Modern, simple, Google-like search

–Easy access to NSX activities and security events

–Integrates with all major 3rd party network vendors with out of the box discovery of             virtual & physical topology

–Quickly onboard existing teams to operate NSX easily

Some of the Features-

East-West Traffic Analysis (Deep insight within your VMware Infrastructure)

  • East-West Traffic Flow Analysis
  • Breakdown of Data Center Traffic by East-West, VM-to-VM, VM-to-Physical, Switched, Routed, etc.
  • Get Detailed Flow stats behind each number

2.GIF

Micro-Segmentation – Security Policy Automation

  • Discover vCenter and NSX constructs (folders, clusters, vlans, security tags)
  • Automated Security Groupings Based on vCenter and NSX Constructs, Workload Characteristics, Ports, Common Services
  • Recommended Security Policies / Firewall Rules (Zero-Trust Model)
  • See Network Traffic Per Host, Per VM
  • Export as CSV

3.gif

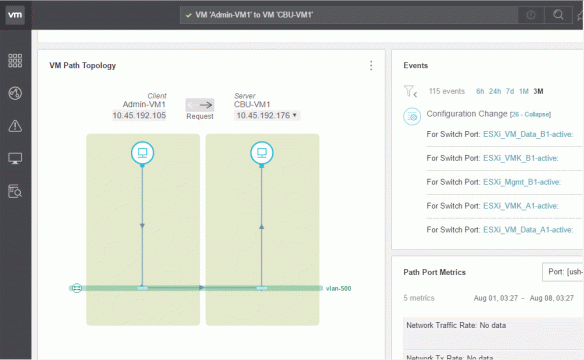
If you see above figure , “Prod-Web” vm’s having connectivity with “Prod-Midtier” , as well as Internet ,shared Physical servers and DC Physical Servers.

Have you ever seen like this , so much of visibility in your virtual infrastructure.

4

Data Paths Across Overlay (vxlan) And Underlay (Physical/vLAN)

  • VM to VM, VM to Physical, VM to Internet
  • Hop-by-Hop Path across Overlay (LDRs, Edge Gateways) and Underlay (Physical VDCs & VRFs)

5.gif


Two appliances have to be deployed:

  • vRealize Network Insight Platform
  • vRealize Network Insight Proxy

Resource requirements:

  • vRealize Network Insight Platform OVA:
  1. 750 GB – HDD, Thin provisioned
  2. 32 GB RAM – Reservation – 16GB
  3.  8 cores – Reservation 4096 Mhz
  • vRealize Network Insight Proxy OVA:
  1. 4 cores – Reservation 2048 Mhz
  2. 10 GB RAM – Reservation – 5GB
  3. 150 GB – HDD, Thin provisioned
  • VMware vCenter Server (version 5.5 and 6.0).
  • To configure and use IPFIX
  • vCenter Server Credentials with privileges:
    • Distributed Switch: Modify
    • dvPort group: Modify
  • VMware ESXi:
    • 5.5 Update 2 (Build 2068190) and above
    • 6.0 Update 1b (Build 3380124) and above
  • Recommended that VMware Tools is installed on all the Virtual Machines in the data center. This helps in identifying the VM to VM traffic.

Software requirements

  •  Google Chrome browser

Installation Workflow

6.gif

Download From Here

PowerActions for vSphere Web Client

PowerActions integrates the vSphere Web Client and PowerCLI to provide complex automation solutions from within the standard vSphere management client.

PowerActions is deployed as a plugin for the vSphere Web Client and will allow you to execute PowerCLI commands and scripts in a vSphere Web Client integrated Powershell console.

Furthermore, administrators will be able to enhance the native WebClient capabilities with actions and reports backed by PowerCLI scripts persisted on the vSphere Web Client. Have you ever wanted to “Right Click” an object in the web client and run a PowerCLI script? Now you can!

For example I as an Administrator will be able to define a new action for the VM objects presented in the Web client, describe/back this action with a PowerCLI script, save it in a script repository within the Web client and later re-use the newly defined action straight from the VM object context (right click) menu.

Or I as an Administrator can create a PowerCLI script that reports all VMs within a Data Center that have snapshots over 30 days old, save it in a script repository within the Web client and later execute this report straight from the Datacenter object context menu.

Or better yet, why not share your pre-written scripts with the rest of the vSphere admins in your environment by simply adjusting them to the correct format and adding them to the shared script folder.

PowerActions is a plugin for the vSphere Web Client – if you manage multiple Virtual Centers from a single web client instance it will work with all registered vCenters.

Download Here 

poweraction

Learn NSX – Part-04 (Configure NSX Manager)

Friends , this get a bit delayed as i was busy with other commitments , here comes the next part…

You must log in to the NSX Manager virtual appliance to register vCenter Server and review the settings specified during installation.

Prerequisites to Configure –

  • The NSX management service must be running.
  • You must have a vCenter Server user account with administrative access to synchronize NSX Manager with the vCenter Server.
  • If your vCenter password has non-ASCII characters, you must change it before synchronizing the NSX Manager with the vCenter Server.
  • FTPS (or FTP) server available.
  • To use the VMware vCenter Single Sign-On™ service on NSX Manager, you must have vCenter Server 5.5 or later and the vCenter Single Sign-On service must be installed on vCenter Server. Note that this is for embedded single sign-on (SSO). Your deployment might use an external centralized SSO server based on Active Directory.

1 – Connect to the NSX Manager using DNS/IP address of NSX manager appliance.

The default user name is admin. The password was set during the deployment of the             NSX Manager OVA.

1.gif

2 – In the NSX Manager main screen, select View Summary and verify that the following              services are running:

  • VMware vFabric® Postgres
  • Pivotal RabbitMQ
  • NSX Management Service

2.gif

3 – From the NSX Manager main screen, select Manage Appliance Settings > Settings >                General. In the Time Settings section, verify that the NTP server entries are correct.

3

4

5

4 – In the Syslog Server section, click Edit, enter the appropriate Syslog server settings and        click OK.

67

5 – In Components > NSX Management Service, in the vCenter Server section, click Edit to connect NSX Manager to vCenter Server.

In the vCenter Server dialog box:

  1. Enter the vCenter Server FQDN in the vCenter Server text box.
  2. Enter the vCenter user name in the vCenter User Name text box.
  3. Enter the password for the vCenter user in the Password text box.
  4. Click OK.

89

6 – In the Trust Certificate dialog box:

  1. Click Yes to proceed with the SSL certificate.
  2. After a short period, verify that the vCenter Server status displays Connected.

10

7 – In Components > NSX Management Service, in the Lookup Service section, click Edit to        connect to the SSO Server.

In the Lookup Service dialog box, enter the appropriate values:

  1. Enter the IP address of the SSO server in the Lookup Service IP text box.
  2. Enter 7444 in the Lookup Service Port text box
    1. NOTE – use port 443 for vSphere 6 VMware Platform Services Controller™.
  3. Enter the user name for the SSO Administrator in the SSO Administrator User Name text box.
  4. Enter the password for the SSO Administrator in the Password text box.
  5. Click OK.

1112

8 – In the Trust Certificate? dialog box:

  1. Click Yes to proceed with the SSL Certificate.

After a short period, verify that the Lookup Service status displays Connected.

1314

Now with all above steps , NSX Manager is integrated  with vCenter. now lets move ahead with deployment of Controllers , Happy Learning 🙂