In today’s fast-paced digital landscape, businesses require agile and scalable solutions to deploy and manage their applications efficiently. VMware Cloud Director Content Hub (VDCH) introduced in VMware Cloud Director 10.5, offers a robust platform for a simplified and automated way to deploy, run, and manage a wide range of applications. In this blog, we’ll explore the key features and benefits of VMware Cloud Director Content Hub and how it streamlines the application deployment process.
What is Content Hub ?
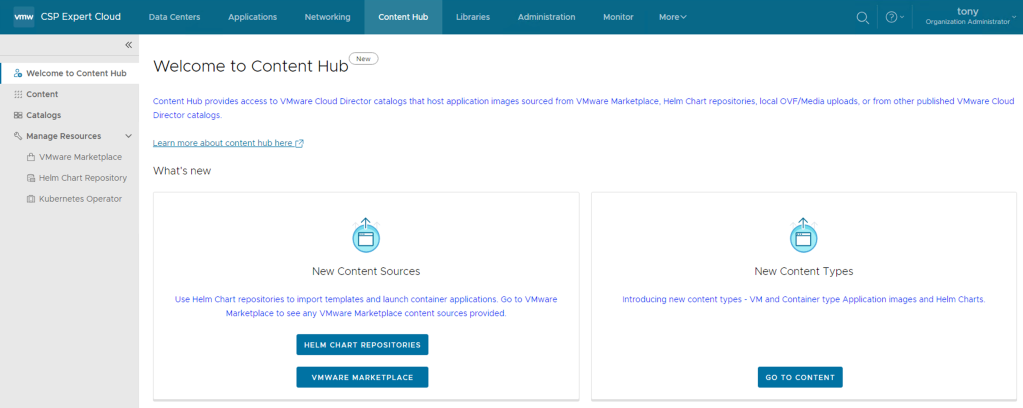
Content Hub, introduced in VMware Cloud Director 10.5, serves as a convenient tool that unifies the interface for accessing both VM and container-based content. This feature seamlessly integrates external content sources, such as VMware Marketplace and Helmchart Repositories, into the VMware Cloud Director environment.
By incorporating external sources, content can be seamlessly brought into the catalogs of VMware Cloud Director, ensuring its immediate availability for users. With the integration of Content Hub, VMware Cloud Director introduces an interface oriented towards applications, enabling users to effortlessly visualize and retrieve catalog content, thus elevating the overall content management experience.
As a result of these enhancements, catalog items are presented as “Application Images,” highlighting crucial application information like the application’s name, version, logo, screenshots, and other pertinent details necessary for the consumption of the application
Integration with VMware Marketplace
To integrate Marketplace with VMware Cloud Director, a Cloud Provider needs to create a Marketplace Connection and then share it with one or more tenant organisations. Here is the procedure:
- Cloud Provider must be logged in as a system administrator.
- Cloud Provider must have access to VMware Marketplace and there generated an API token. (see Generate API Tokens in the VMware Cloud Services Product Documentation)
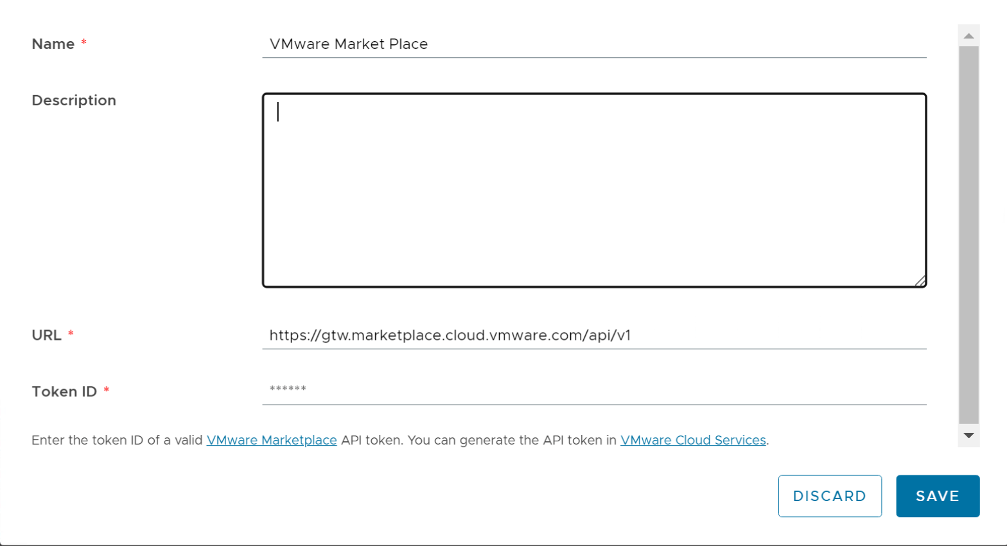
- From the left panel, select VMware Marketplace & Click New.
- The New VMware Marketplace dialog opens, and there enter the following values:
| Name | Some meaning full name |
| URL | vCD uses https://gtw.marketplace.cloud.vmware.com/api/v1 to connect to Marketplace. This URL cannot be changed. |
| Token ID | The API token ID of a valid VMware Marketplace token. |
Integration with Helm Chart Repository
A Helm chart repository is a named resource that stores all the information required to establish a connection with a Helm chart repository, allows users to browse contents from a remote repository, and imports applications from the repository.
Cloud Providers and tenants both can create Helm chart repository content connections. Tenants need special RIGHTs that providers can assign to specific tenants based on requirements.
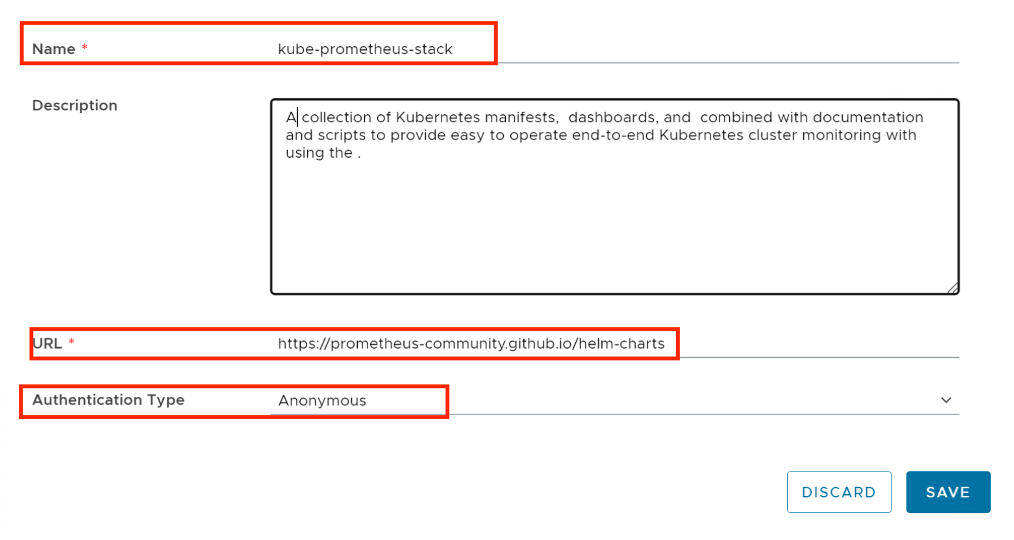
- From the left panel, select Helm Chart Repository & Click New.
- The New Helm Chart Repository dialog opens, and there enter the following values:
| Name | Some Meaning Full Name |
| URL | URL of Helm chart repository |
| Authentication Type | Anonymous Basic |
- Password-protected Helm chart repositories are also supported.
- You can create multiple Helm chart repository resources in VMware Cloud Director.
Share a VMware Marketplace/Helm Chart Repository Resource with tenants
As a service provider administrator, you can share the configured VMware Marketplace resources with other tenant organizations.
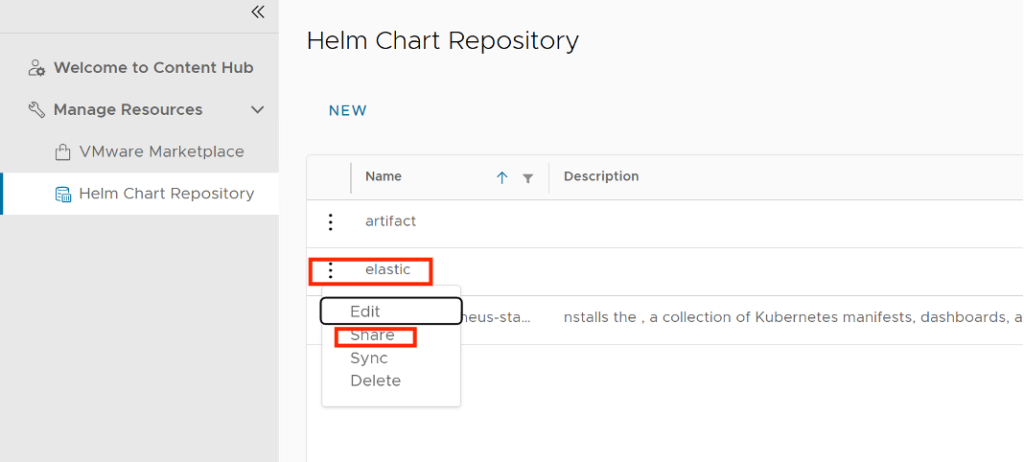
- Inside VMware Marketplace/Helm Chat Repository, on the left of the name of the connection that you want to share, click the vertical ellipsis and select Share.
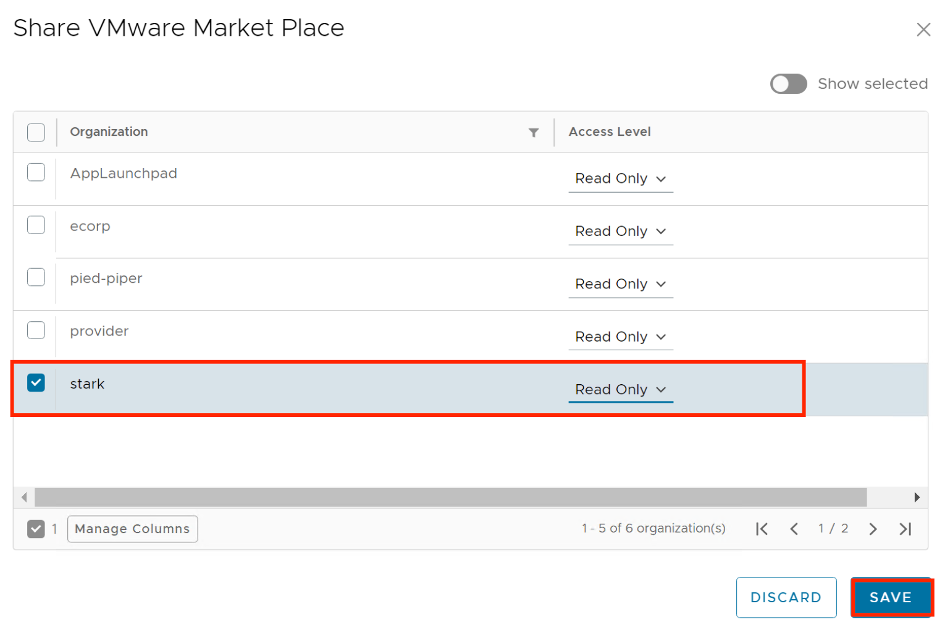
- Share the resource.
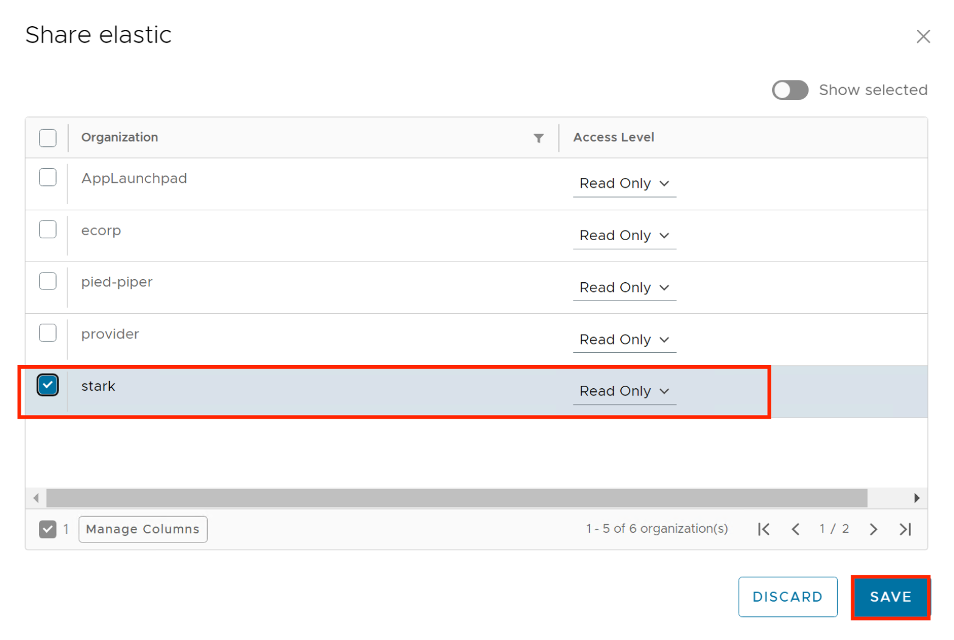
- Select the tenant organizations you want to share the resource with.
- You can set the individual access level for the respective tenant organization only as Read Only.
- Click Save.

NOTE: Since vCD does a DB caching of the helm chart repository items in vCD DB, you can click on Sync which will ensure the latest from the remote repository is cached in vCD DB.
Roles Required
A new set of User Roles has been introduced to facilitate users in accessing and managing the Content Hub. Assigning the appropriate user roles to individuals within the organization to grant them access and utilize the Content Hub feature effectively is crucial.
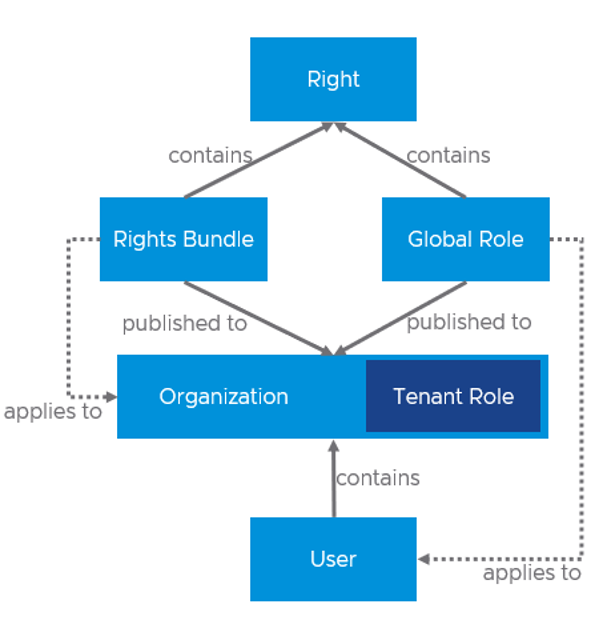
Right Bundles: A Rights Bundle is a collection of rights for the tenant organization and A Rights Bundle defines what a tenant organization has access to. Rights Bundles are always defined globally, and they can be applied to zero or more tenants.
Roles: A Role is a collection of rights for a user. A Role defines what an individual user has access to. Roles can either be tenant-specific–defined within a single organization and only visible to that organization, or global–defined globally and applied to zero or more tenants.
Putting all the pieces together looks something like this:
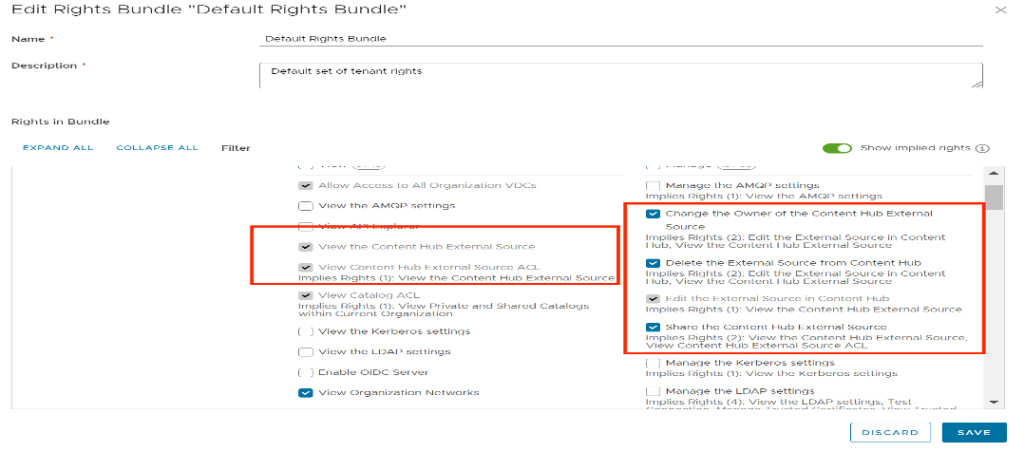
Following are the new RIGHTs introduced to manage CatalogContentSource entities:
| View the Content Hub External Source | view “CatalogContentSource” entities |
| View Content Hub External Source ACL | view ACLs on “CatalogContentSource” entity |
| Change the Owner of the Content Hub External Source | change ownership of “CatalogContentSource” entity |
| Delete the External Source from Content Hub | To allow deletion of “CatalogContentSource” entity |
| Edit the External Source in Content Hub | To allow the creation/edit of “CatalogContentSource” entity NOTE – Tenants will not be allowed to create Marketplace type even with this RIGHT |
| Share the Content Hub External Source | To allow sharing of CatalogContentSource. NOTE – Only Cloud Provider can share across tenants. Tenants can only share among users. |
Apply the Above Rights for organizations as well as the user, so that they have enough rights to add and deploy applications.
Content Hub Operator for Kubernetes Container Service Extention
To perform this operation, First, you need full control of the Kubernetes cluster, where you are deploying the container applications, and additionally the following VMware Cloud Director rights:

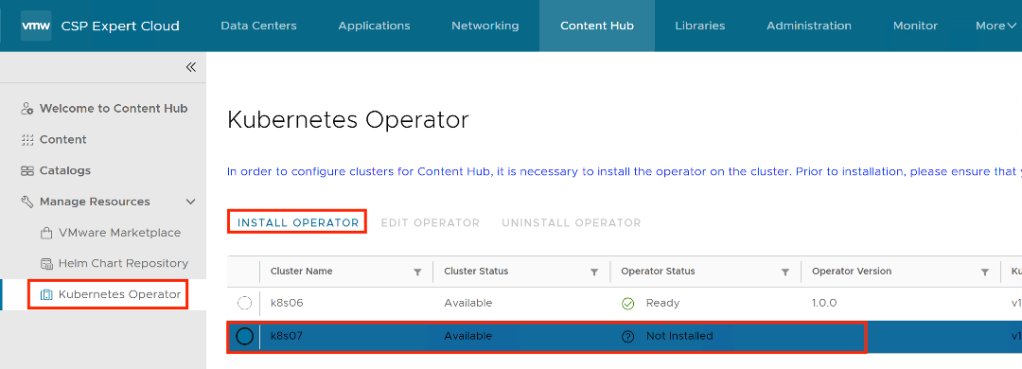
You must install a Kubernetes operator to allow tenant users to deploy container applications from external content sources. From the top navigation bar, select Content Hub, from the left panel, select Kubernetes Operator, and on the Kubernetes Operator page, select the Kubernetes cluster on which you want to install the Kubernetes operator, and click Install Operator.
The Install operator on cluster-name dialog opens, on this page Configure the source location of the Kubernetes operator package.
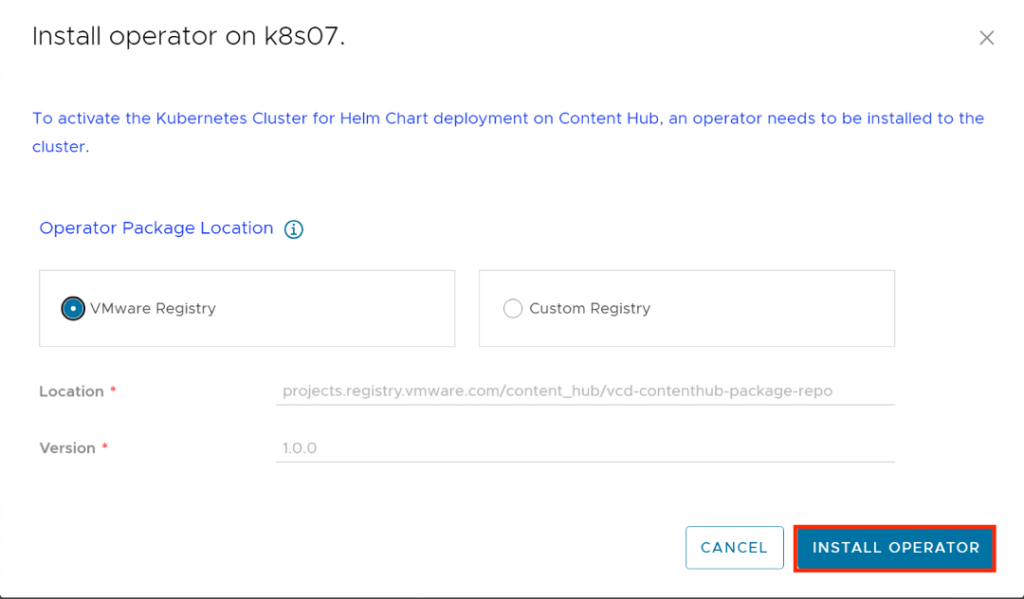
Select the type of source location for the Kubernetes operator package. VMware Registry location with anonymous access is selected by default.
(Optional) To configure a custom registry, first, you must clone the Content Hub Kubernetes operator package from the VMware container registry to your custom registry. The Content Hub Kubernetes operator package is in Carvel format and you must use the Carvel imgpkg tool for cloning the package.
Click Install Operator.
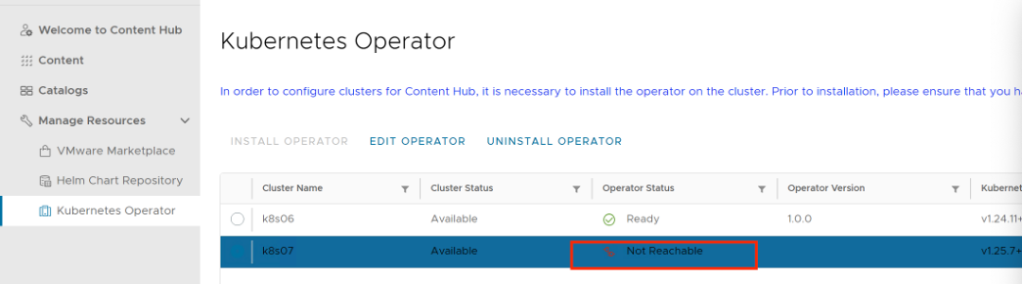
After a Few minutes it shows “Not Reachable”

And then finally it turns to “ready”, basically After the installation of the operator completes successfully, the system creates two namespaces under the Kubernetes cluster. In the first namespace, “vcd-contenthub-system”, the Content Hub Operator manager is installed. The second namespace, “vcd-contenthub-workloads”, is empty. This namespace is used to deploy container applications at a later stage.
Catalog Versioning
In the previous version of VMware Cloud Director, there was no concept of versioning in catalogs. For instance, when a user imports multiple versions of the same application from external sources into the catalog, each version of the VM or container will be stored and represented (listed) as an individual resource, but from VMware Cloud Director 10.5 onwards, a Virtual Machine application or Container application that was imported with multiple versions either at the same time or at different intervals, Content Hub is capable of managing and structure the versioning of that resource.
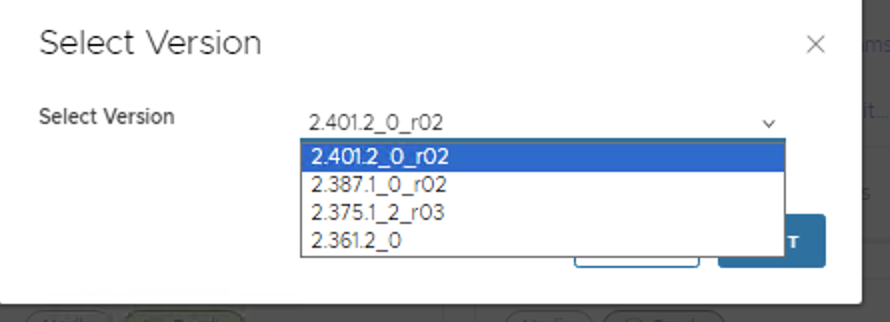
Let’s Deploy a Container Application
Upon launching an application image that has multiple versions, you will be prompted to choose the specific version of the image you wish to deploy.
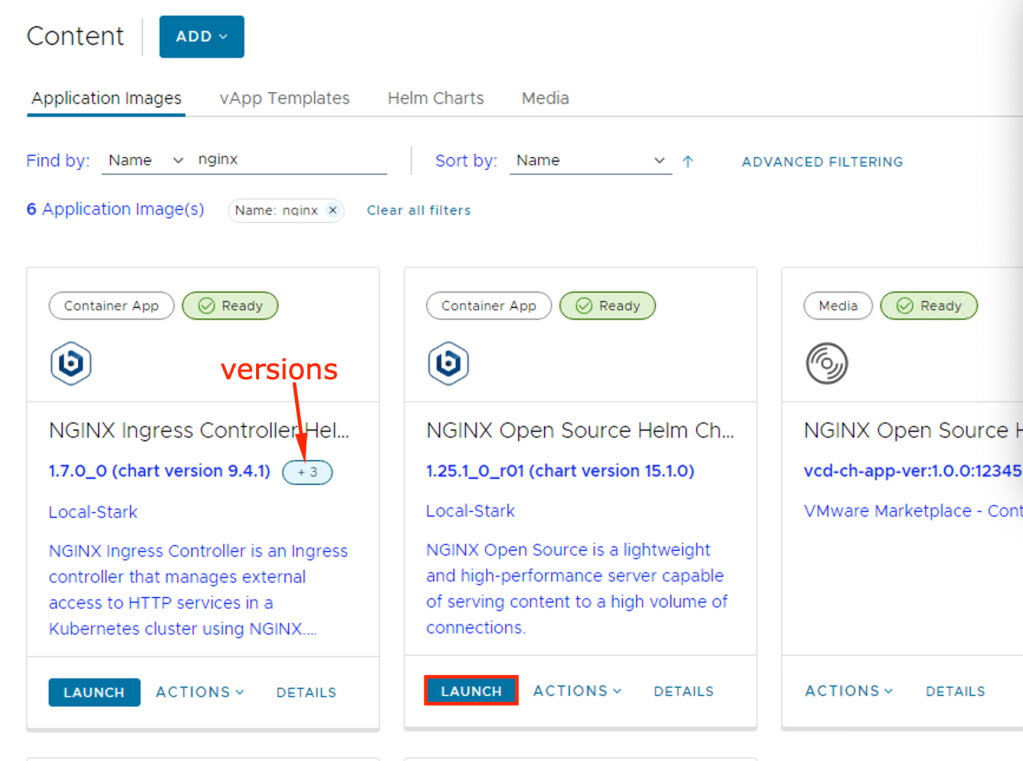
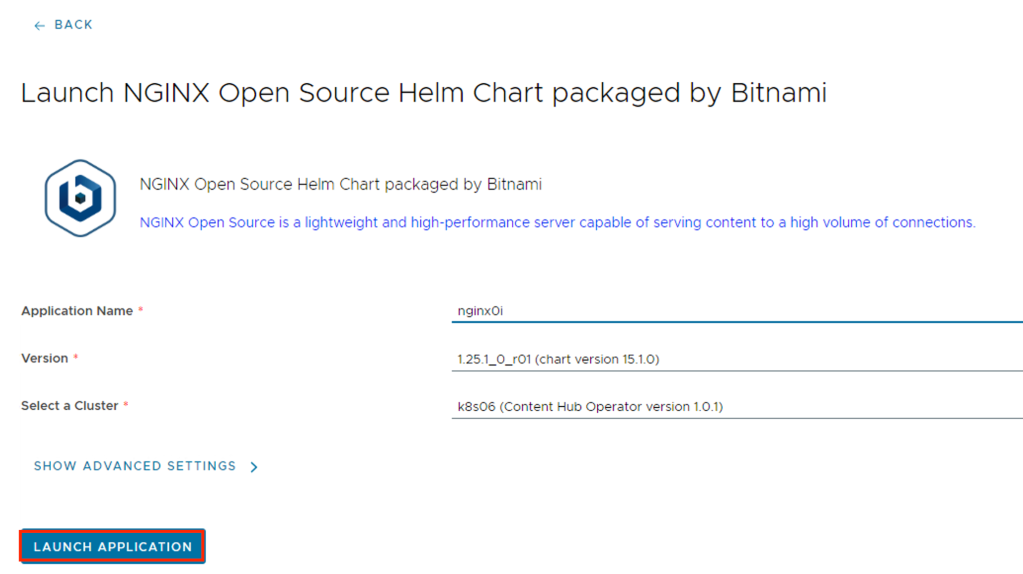
If the Container application is launched, then the Container Application launcher window will open and then you need to provide the application Name, select the version to deploy and select the TKG Cluster.
(Optional) To customize the application parameters, click Show Advanced Settings.
Click Launch Application.
The system deploys the container application. After the deploy operation completes, on the card for the application, the status appears as Deployed. VMware Cloud Director deploys the container application as a Helm release under the vcd-contenthub-workloads namespace to the Kubernetes cluster.

Either clicking on Application Name or DETAILS, it takes user to details of the application, like Status, Pods Status, Access URLs etc..
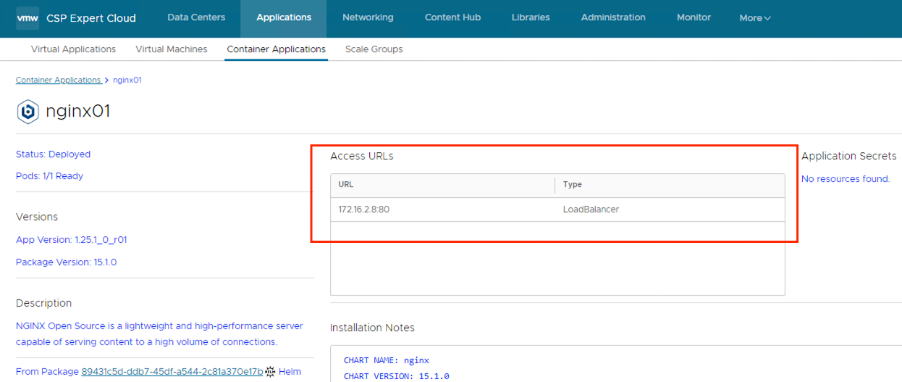

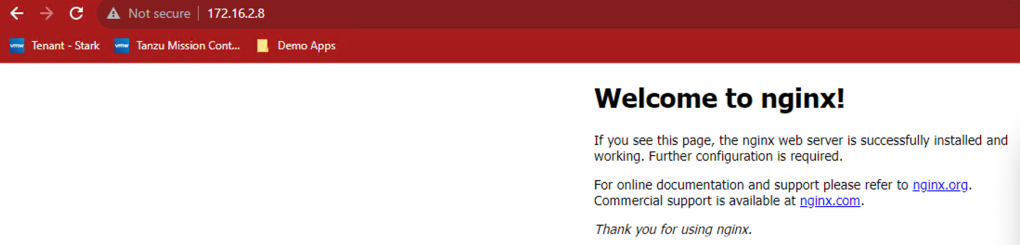
User can use the access URL details to access the application easily
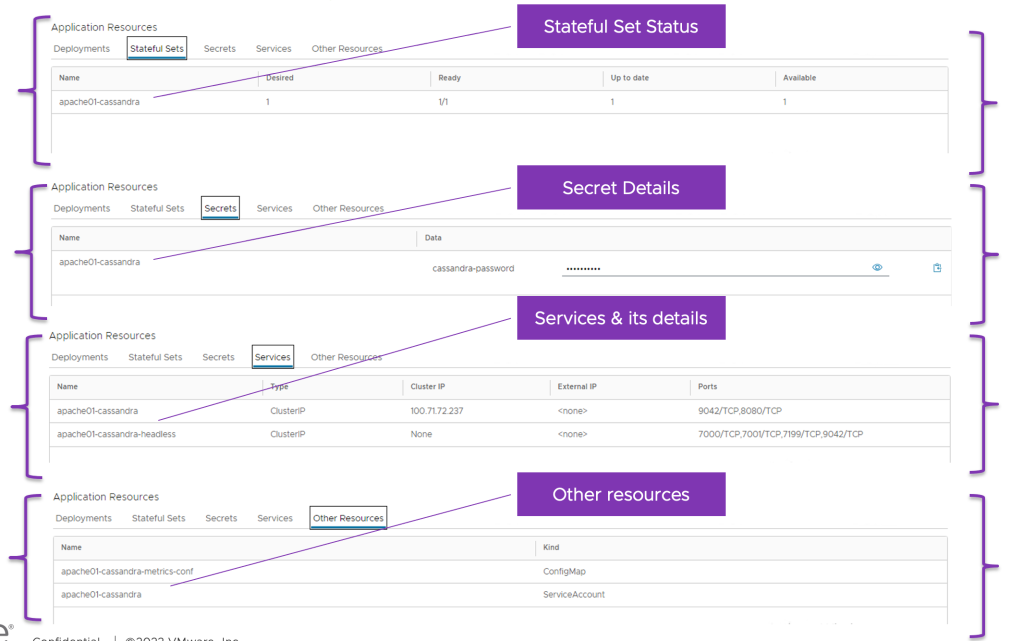
Deploy an Stateful Container Application
In this section we will deploy Casandra database using Cloud Director Content Hub, process is simple as we followed in above section, once deployed the application, check the details, here details are different like no access URL, it also created required Persistent Volumes automatically

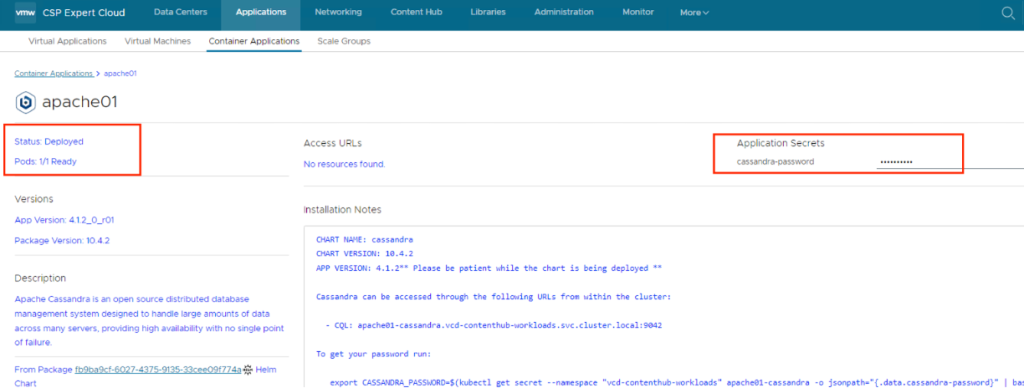
it also give visibility to Stateful Set and its status, secrets if any, services and its type as well as other resources. this allow end user to not to check in K8s clusters vs this info is available in vCD GUI.
Deploy an Virtual Machine Application
A vApp consists of one or more virtual machines that communicate over a network and use resources and services in a deployed environment. A vApp can contain multiple virtual machines.If you have access to a catalog, you can use the vApp templates in the catalog to create vApps.
A vApp template can be based on an OVF file with properties for customizing the virtual machines of the vApp. The vApp inherits these properties. If any of those properties are user-configurable, you can specify their values.

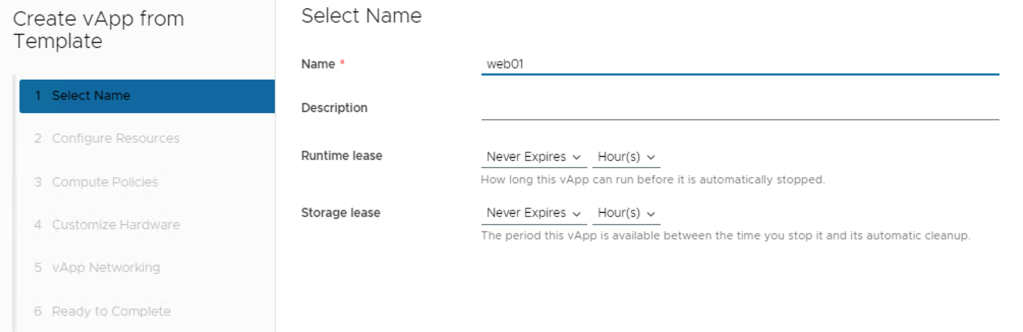
Enter a name and, optionally, a description for the vApp.
Enter a runtime lease and a storage lease for the vApp, and click Next.
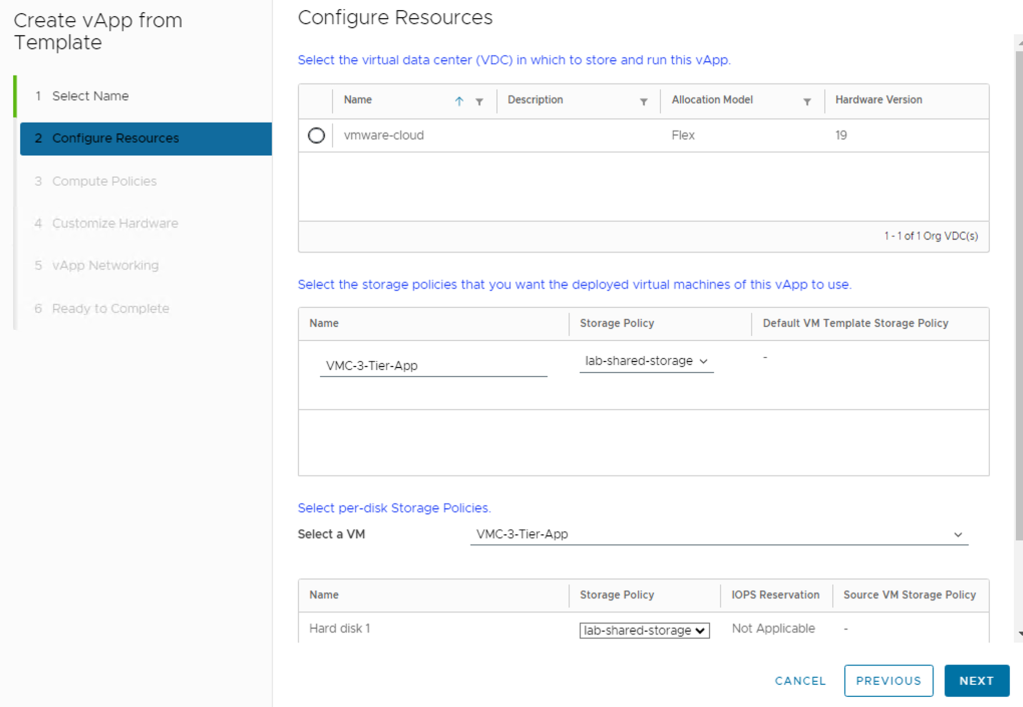
From the Storage Policy drop-down menu, select a storage policy for each of the virtual machines in the vApp, and click Next.
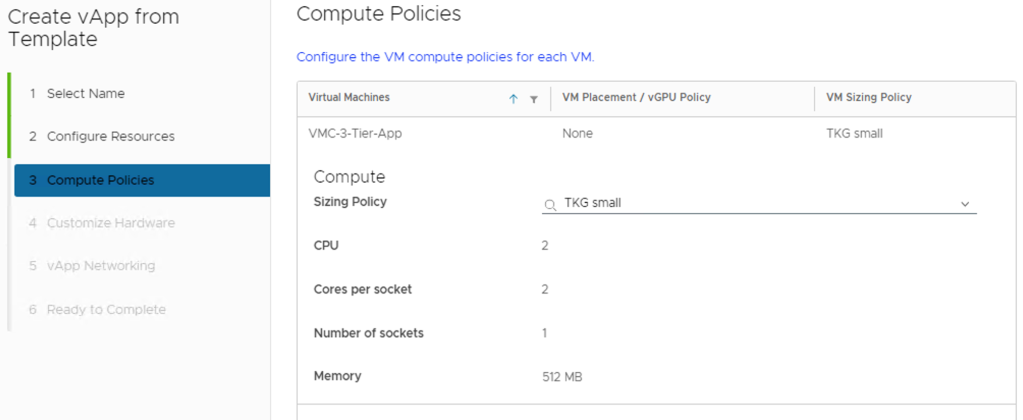
If the placement policies and the sizing policies for the virtual machines in the vApp are configurable, select a policy for each virtual machine from the drop-down menu.
If the hardware properties of the virtual machines in the vApp are configurable, customize the size of the virtual machine hard disks and click Next.

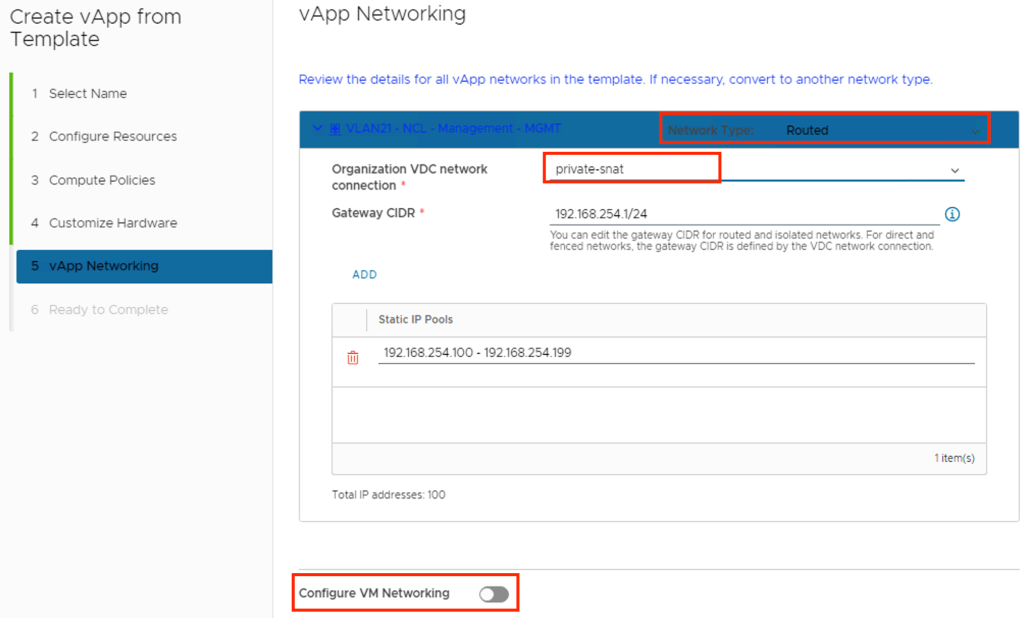
If the networking properties of the virtual machines in the vApp are configurable, customize them and click Next.
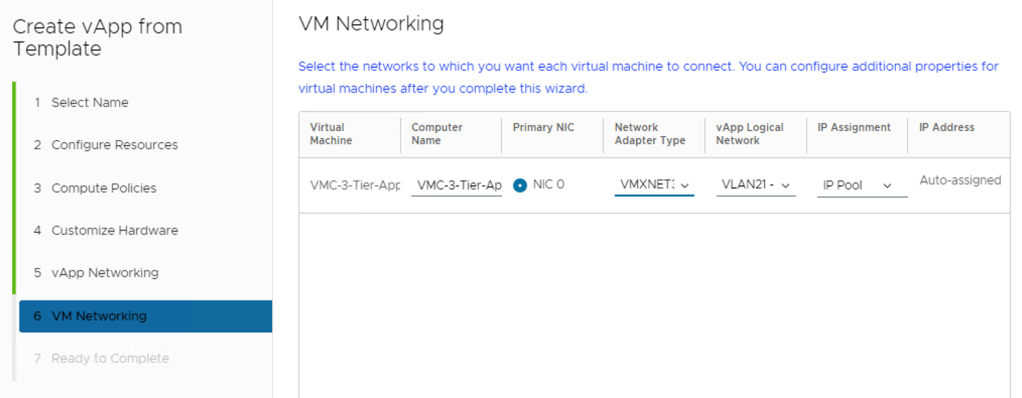
On the Configure Networking page, select the networks to which you want each virtual machine to connect.
(Optional) Select the check box to switch to the advanced networking workflow and configure additional network settings for the virtual machines in the vApp.
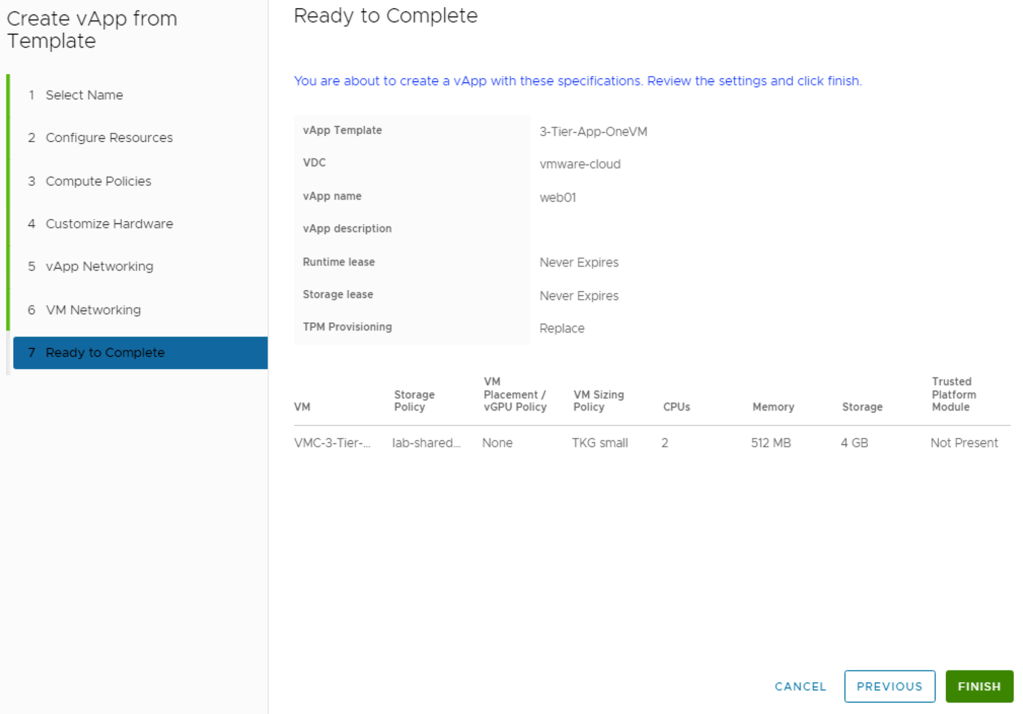
Review the vApp settings and click Finish.
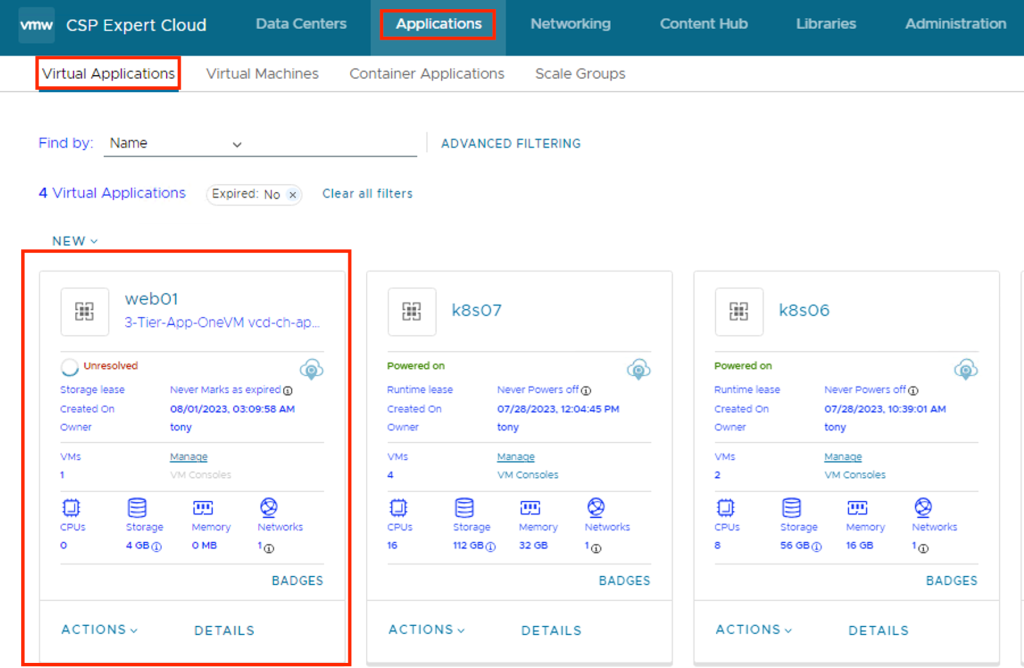
You can see under Applications -> Virtual Applications, VM is getting deployed.
With Content Hub feature provide can offers centralized content management for application images, vApp and VM templates, and media. VMware Cloud Director now has full control over the deployed and listed images, storing all pertinent information in its database. Unlike the application images imported from App Launchpad, where VMware Cloud Director only listed the imported images and App Launchpad stored all the details and information in its own database as well as It offers ease of use since you won’t have to set up and configure App Launchpad, which would otherwise be an additional task.